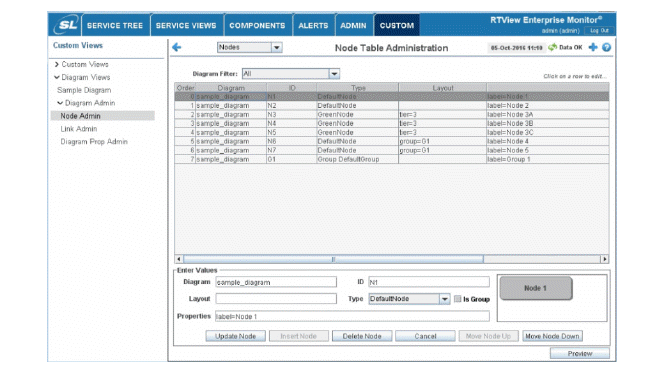
Use this Diagram Generator display to create new diagrams and add or edit nodes in existing diagrams. Diagram definitions are stored in the DIAGRAMS database.
To define a new diagram, enter a new diagram name in the Diagram field, then fill in the fields in the Enter Values section to define the first node in the diagram.
To add a new node to a diagram, enter the name of the diagram to which you want to add the node, then fill in the fields in the Enter Values section, described below, and click Add Node.
To edit an existing node, select it in the table to populate the Enter Values fields at the bottom of the display, make your changes and click Update Node.
For each node in your diagram display, fill in the following fields:
|
Diagram |
Required. The name of the diagram. Note: The diagram name GLOBAL is reserved for global properties in Diagram Props. The value in this column will be used to identify this diagram when you add this diagram to the navigation tree. |
|
ID |
Required. Must be unique within the diagram across nodes and links. Use this value in the Link Node1 and Node2 fields to refer to this node. The value must be alpha-numeric but may contain underbars (_). |
|
Layout |
Optional. One or more layout options for the icon. All icons with the same tier=value will be positioned in a single tier (row if the diagram property orientation=VERTICAL, column if orientation=HORIZONTAL). Each tier is centered along the diagram’s centerline unless only one node in a tier has a link to another tier. In that case the node with the link is centered on the diagram’s centerline. All icons with the same group=value will have a group object drawn behind them. The group value must be the ID of a node whose type is defined as a Group. To specify both a tier and a group, separate them with a ~. For example: tier=T1~group=G1 |
|
Type |
Required. The name of the object in the objectTemplateDisplay file to use as the icon for this node. When you select a type from the list, you will see a preview of it to the right of the Type field. |
|
Is Group |
Optional. Check to specify that this node is a Group. Groups are only drawn if at least one node references them in their Layout field. They are drawn behind the nodes that reference them and their extent is set to the combined extent of all nodes that reference them. In wrapped diagrams, if the nodes in the group break across multiple tiers, the group object will be broken across the tiers as well. |
|
Properties |
Optional. One or more properties to set on the node icon delimited by ~. Syntax is propName=propVal~propName2=otherPropVal. Note that property values must be specified as they are saved in .rtv files, which is not necessarily the same as they are shown in the Object Properties dialog in the Display Builder. In addition to properties on the RTView object, you can also specify hGap or vGap to override the diagram property hGap or vGap for this object. The hGap is applied to the left of an object and the vGap is applied above an object. For example, you must specify the font index instead of the font name for font properties, and the color index instead of the color for color properties. |
Use the following buttons to save changes to the database and to preview the diagram display (after the changes have been saved to the database):
|
Update Node |
Save changes to the selected node to the database. This is only enabled if the selected node is already in the database. |
|
Insert Node |
Insert a new node to the database. This is only enabled if the selected node is not in the database. |
|
Delete Node |
Delete the selected node from the database. This is only enabled if the selected node is already in the database. |
|
Cancel |
Clear the Enter Values fields. |
|
Move Node Up |
Move the selected node up in the diagram. Nodes are laid out in the diagram according to their order. |
|
Move Node Down |
Move the selected node down in the diagram. Nodes are laid out in the diagram according to their order. |
|
Preview |
Open a window showing the selected diagram as it is saved in the database. Changes to the diagram will not update an open preview window. To update the diagram in the preview window, close and reopen the window. |