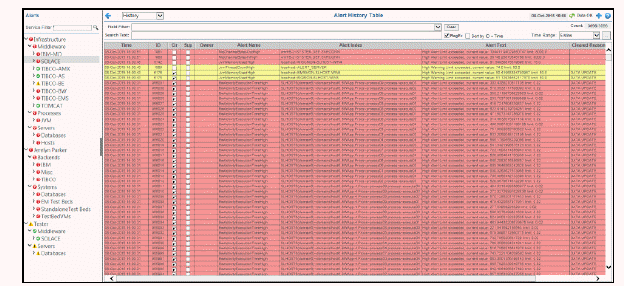
Use this display to track the history of any alert that has occurred in your RTView Enterprise system. There is one row in the table for each update to each alert. The table is limited to 20,000 rows. If there are more than 20,000 rows in the selected time range, the newest 20,000 rows are shown.
The color coded navigation tree shows the contents of the CMDB hierarchically ordered. Choose a node to filter alerts shown in the table. The Alert History Table only shows alerts associated with the node you select. A green indicator means the node has no associated alerts. A red indicator means the node has one or more associated alerts.
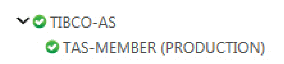
Service name labels are appended with the Environment. For example, the following illustrates that the TAS-MEMBER Service currently has no alerts in the PRODUCTION Environment.
To filter the table, select a table column from the Field Filter drop-down menu. In the Search Text field, enter the (case-sensitive) string to search for in the selected Field Filter, then click <Enter>. Click Clear to clear the Field Filter and Search Text fields.
The Count label shows two values: the filtered row count / the total row count.
Click a column heading to sort the table by the column data.

Note: The Count field in the title bar of this display shows two values: the filtered row count and the unfiltered row count.
The row color indicates the most critical alert state for the row, as follows:
|
Row Color Code: Tables with colored rows indicate the following: |
|
|
|
|
|
Fields and Data This display includes: |
|||
|
|
Field Filter |
Select a table column from the drop-down menu to perform a search in: Alert Name, Alert Text, Cleared Reason, Clr, ID, Owner, Sev, Source, Sup, ID or Time. Filters limit display content and drop-down menu selections to only those items that pass through the selected filter's criteria. If no items match the filter, you might have zero search results (an empty table). |
|
|
|
Clear |
Clears entries in the Alert Name Filter field and all table data. |
|
|
|
Search Text |
Enter the (case-sensitive) string to search for in the selected Field Filter. |
|
|
|
RegEx |
Toggles the Search Text field to accept Regular Expressions for filtering. |
|
|
|
Sort by ID + Time |
When checked, table rows are sorted by the Time and ID columns. |
|
|
|
Time Range |
Select a time range from the drop down menu varying from 2 Minutes to Last 7 Days, or display All Data. To specify a time range, click Calendar 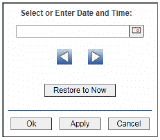
By default, the time range end point is the current time. To change the time range end point, click Calendar Use the navigation arrows Click Restore to Now to reset the time range end point to the current time.
|
|
|
|
Alerts Table This table lists all alerts for all Owners and all Areas that have occurred in your RTView Enterprise system. Filter the list by alert names using the Alert Name Filter drop-down menu. |
||
|
|
|
Time |
The date and time the alert first occurred. |
|
|
|
ID |
The unique string identifier for the alert. |
|
|
|
Clear |
When checked, the alert has been cleared by a user. |
|
|
|
Sup |
When checked, the alert has been suppressed by a user. |
|
|
|
Owner |
The named owner assigned by the administrator. |
|
|
|
Alert Name |
The name of the alert. |
|
|
|
Alert Index |
Lists the Alert Indexes, separated by tildes (~), for the alert. |
|
|
|
Alert Text |
Descriptive text about the alert. |
|
|
|
Cleared Reason |
DATA UPDATE: The metric returned to normal thresholds. MANUAL: A user cleared or closed the alert manually. |
|
|
|
Sev |
The severity level of the alert. |
|
|
|
Source |
The name of the back-end Data Server reporting the alert. |
 Red indicates that one or more alerts exceeded their ALARM LEVEL threshold in the table row.
 Yellow indicates that one or more alerts exceeded their WARNING LEVEL threshold in the table row.
 Green indicates that no alerts exceeded their WARNING or ALARM LEVEL threshold in the table row.
 .
.  and select a date and time from the calendar or enter the date and time in the text field using the following format:
  to move forward or backward one time period. NOTE: The time period is determined by your selection from the