Configure RTView Manager
Use the RTView Manager application to track the health of your RTView monitoring system: RTView and Tomcat processes, the historian and connected data servers. RTView Manager runs as a process, separately from your RTView monitoring system, has its own URL / console, as well as its own data server, database, alert notification system and historian.
RTView Manager auto-discovers its connections which you cannot modify. This section describes how to modify the RTView Manager default settings that you can modify.
You can use the RTView Configuration Application to modify most of the RTView Manager settings.
To access RTView Manager, start RTView Enterprise (if not currently running), then browse to one of the following URLs and login (username/password are rtvadmin/rtvadmin):
http://<ip_address>:3070/rtview-manager if you are running on Jetty.
http://localhost:8068/rtview-manager if you are using Tomcat.
For details about displays that come with RTView Manager for RTView Enterprise, refer to the RTView Enterprise User's Guide.
This section contains:
| • | Open the RTView Configuration Application for RTView Manager: Describes how to logon to the RTView Configuration Application for RTView Manager. |
| • | Modify Default Polling Rates for RTView Manager Caches |
| • | Modify Default Settings for Storing Historical Data |
| • | Change Port Assignments |
| • | Configure Alert & Historical Database Connections |
| • | Configure Alert Notification: Describes how to setup alert notification. |
| • | Configure High Availability: Describes how to configure HA. |
| • | Troubleshoot: Tips for resolving technical issues. |
Open the RTView Configuration Application for RTView Manager
To access the RTView Configuration Application for RTView Manager:
| 1. | Start RTView Enterprise (if not currently running), then browse to one of the following URLs and login (username/password are rtvadmin/rtvadmin): |
| • | http://<ip_address>:3070/rtview-manager-rtvadmin if you are using Jetty. |
| • | http://localhost:8068/rtview-manager-rtvadmin if you are using Tomcat. |
The RTView Manager main console opens.
The RTView Configuration Application HOME page opens.
Select the RTView Server - RTView Manager Monitor project.
The main configuration page for RTView Manager opens.
The navigation tree is in the left panel and the General and Custom Properties tabs are shown in the upper part of the main page. The name of the selected tab is highlighted and the other tabs are grayed out. You click on either of the grayed tabs to change the selected tab.

These instructions use the following format to describe navigation to each tab: Navigation tree>Tab. For example, the figure above illustrates the General>GENERAL Tab.
Modify Default Polling Rates for RTView Manager Caches
To modify the default polling rate settings for RTView Manager caches, perform the following:
| • | Open the RTView Configuration Application for RTView Manager and go to RTView Manager Monitor project>DATA COLLECTION tab. |
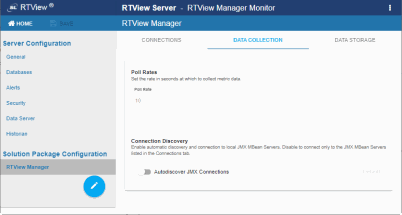
Poll Rates: Collection period in seconds. The default setting is 10 seconds.
Autodiscover JMX Connections: Toggle ON to enable RTView to automatically discover JMX MBean Servers. Toggle OFF to restrict connections to the JMX MBean Servers that are listed in the CONNECTIONS tab. Blue (toggled right) enables, gray (toggled left) disables. By default, this feature is disabled.
| • |
 to apply changes. The data server will be available again in 10-15 seconds. to apply changes. The data server will be available again in 10-15 seconds. |
Modify Default Settings for Storing Historical Data
Use the RTView Configuration Application to change the default settings for storing historical data for RTView Manager and the default cache settings to modify the default behavior of the data being collected, aggregated and stored.
| • | Define the Storage of In Memory History : Specify the maximum number of history rows to store in memory. |
| • | Define Compaction Rules : Define rules for reducing the amount of data stored over time. |
| • | Define Duration : Specify when data becomes expired and/or deleted from the Monitor. |
| • | Enable/Disable Storage of Historical Data : Choose the metrics you want to store in the database and specify a prefix for history table names. |
| • | Define Prefix for All History Table Names : Specify a prefix to prepend to database table names. |
Define the Storage of In Memory History
You can define the maximum number of history rows to store in memory in the RTView Manager/Data Storage/History Rows property. This property can improve Monitor responsiveness.
Note that changing this value is only recommended if you have a high degree of understanding about how historical data is being stored in memory, as well as how that data is compacted and stored in the database.
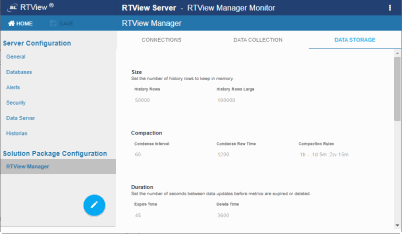
The History Rows property defines the maximum number of rows to store for the JvmGcInfo, JvmMemoryPool, RtvDataServerManager, RtvDisplayServerManager and RtvDataServerClientTotals caches. The default setting for History Rows is 50,000.
The History Rows Large property defines the maximum number of rows to store for the JvmOperatingSystem, JvmThreading, JvmMemory, RtvDataServerClientStats and TomcatWebModuleStats caches. The default setting for History Rows Large is 100,000.
To modify the default settings:
| • | Open the RTView Configuration Application for RTView Manager and go to RTView Manager>DATA STORAGE tab. |
| • | Under Size, enter the desired number of rows in the History Rows and History Rows Large fields. |
| • |
 your settings, then click your settings, then click  to apply changes. The data server will be available again in 10-15 seconds. to apply changes. The data server will be available again in 10-15 seconds. |
Define Compaction Rules
Data compaction, essentially, is reducing redundancy in the data to be stored in the database by using a rule so that you store sampled data instead of raw data, which prevents storing of redundant data which potentially can overload the database. The compaction rule is defined through the following fields:
| • | Condense Interval: The time interval at which the cache history is condensed. The default is 60 seconds, which means that every 60 seconds all rows of the same index are condensed. As a result of this first condensing operation there will be only one row per index every minute. The following caches are impacted by this setting: JvmGcInfo, JvmMemoryPool, JvmOperatingSystem, JvmThreading, JvmMemory, RtvDataServerManager and RtvDataServerClientTotals. |
| • | Condense Raw Time: The time span of raw data kept in memory. The default is 1200 seconds. The following caches are impacted by this setting: JvmGcInfo, JvmMemoryPool, JvmOperatingSystem, JvmThreading, JvmMemory, RtvDataServerManager, RtvDataServerClientTotals, TomcatWebModuleStats, TomcatGlobalRequestStats and TomcatWebModuleTotals. |
| • | Compaction Rules: This field defines the rules used to condense your historical data in the database. By default, the columns kept in history are aggregated by averaging rows with the following rule 1h -;1d 5m;2w 15m, which means the data from the last hour is not aggregated (1h - rule), the data from the last day is aggregated every 5 minutes (1d 5m rule), and the data from the last 2 weeks old is aggregated every 15 minutes (2w 15m rule). The following caches are impacted by this setting: JvmOperatingSystem, JvmThreading, JvmMemory, RtvDataServerManager, RtvDataServerClientTotals, TomcatWebModuleStats, TomcatGlobalRequestStats and TomcatWebModuleTotals. |
To modify these settings do the following:
| • | Open the RTView Configuration Application for RTView Manager and go to RTView Manager>DATA STORAGE tab. |
| • | Under Compaction, enter values in the Condense Interval, Condense Raw Time and Compaction Rules fields. |
| • |
 your settings, then click Click your settings, then click Click  to apply changes. to apply changes. |
Define Duration
The data for each metric is stored in a specific cache and, when the data is not updated in a certain period of time, that data either marked as expired or, if it has been expired over an extended period of time, it is deleted from the cache altogether.
| • | Expire Time: This field sets the period of time when the Expire metric from the cache is set to true indicating the entry row is expired. The default expiration time is 45 seconds. The following caches are impacted by this field: JvmConnections, JvmGcInfo, JvmMemoryPool, JvmClassLoading, JvmCompilation, JvmOperatingSystem, JvmThreading, JvmMemory, JvmMemoryManager, JvmSystemProperties, RtvDataServerManager, RtvDisplayServerManager, RtvHistorianManager, RtvDataServerClientStats, RtvDataServerClientTotals, RtvServerVersion, TomcatWebModuleStats, TomcatConnectorInfo, TomcatGlobalRequestStats, TomcatHostInfo, and TomcatWebModuleTotals. |
| • | Delete Time: This field sets the period of time that a given entry row should be expired before it gets deleted from the cache. It defaults to 3600 seconds and applies to the following caches: JvmConnections, JvmGcInfo, JvmMemoryPool, JvmClassLoading, JvmCompilation, JvmOperatingSystem, JvmRuntime, JvmThreading, JvmMemory, JvmMemoryManager, JvmSystemProperties, RtvDataServerManager, RtvDisplayServerManager, TomcatWebModuleStats, TomcatGlobalRequestStats, TomcatWebModuleTotals, RtvHistorianManager, RtvDataServerClientStats, RtvDataServerClientTotals, RtvServerVersion, TomcatWebModuleStats, TomcatConnectorInfo, TomcatGlobalRequestStats, TomcatHostInfo and TomcatWebModuleTotals. |
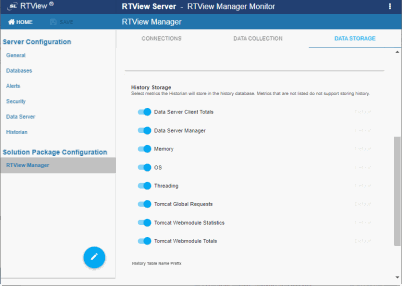
Enable/Disable Storage of Historical Data
Under History Storage you can select which tables you want the Historian to store in the database. To enable/disable the collection of historical data, perform the following:
| • | Open the RTView Configuration Application for RTView Manager and go to RTView Manager>DATA STORAGE tab. |
| • | Scroll down to History Storage andtoggle to enable/disable the storage of various database tables in the database. Blue (toggled right) enables storage, gray (toggled left) disables storage. The caches impacted by these settings are SolAppliances (Message Brokers), SolBridgeStats (Bridge Stats), SolClientStats (Client Stats), SolCspfNeighbors (CSPF Neighbors), SolEndpointStats (Endpoint Stats), SolEndpoints (Endpoints), SolApplianceInterfaces (Interface), SolApplianceMessageSpool (Message Spools), SolEventModuleEvents (Syslog Events) and SolVpns (VPNs). |
| • |
 your settings, then click your settings, then click  to apply changes. to apply changes. |
Define Prefix for All History Table Names
The History Table Name Prefix field allows you to define a prefix that is added to the database table names so that the Monitor can differentiate history data between data servers when you have multiple data servers with corresponding Historians using the same solution package(s) and database. In this case, each Historian needs to save to a different table, otherwise the corresponding data server will load metrics from both Historians on startup. Once you have defined the History Table Name Prefix, you need to create the corresponding tables in your database as follows:
| • | Locate the .sql template for your database under /rtvapm/common/dbconfig and make a copy of it |
| • | Add the value you entered for the History Table Name Prefix to the beginning of all table names in the copied .sql template |
| • | Use the copied .sql template to create the tables in your database |
To add the prefix do the following:
| • | Open the RTView Configuration Application for RTView Manager, go to RTView Manager>DATA STORAGE tab and scroll down to the bottom of the page. |
| • | In the History Table Name Prefix field, enter the desired prefix name. |
| • |
 your settings, then click your settings, then click  to apply changes. to apply changes. |
Change Port Assignments
This configuration is optional.
There are deployment architectures that might require the change of default ports for selected processes, either because the process will be executed multiple times in the same host or because the selected port number is already in use by another application. In these circumstances, you should reassign ports for RTView Manager using the RTView Configuration Application.
|
Java Process |
Description |
Default Port(s) |
|
RTView Manager Data Server |
Gathers performance metrics. |
Default Port= 3078 Default JMX Port = 3068 |
|
|
|
|
|
RTView Manager Historian |
Retrieves data from the RTView Data Server and archives metric history to a database. |
Default JMX Port= 3067 |
To modify port settings or deploy Java processes on different hosts (rather than on a single host):
| 1. | Open the RTView Configuration Application for RTView Manager and go to General>GENERAL tab. |
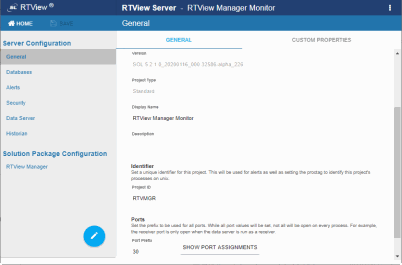
| 2. | Under Ports (scroll down to the bottom of the page), specify the port prefix that you want to use in the Port Prefix field. Click Show Port Assignments to see the port numbers that are created using the Port Prefix you specify. |
| 3. | Click  (in the title bar), then click (in the title bar), then click  to apply changes. to apply changes. |
| 4. | Edit the update_wars (.bat or .sh) file and change the port prefix for all ports to the prefix you just specified. |
| 5. | Rebuild the war files and install them to the application server by executing the following script, located in the /bin directory: |
Windows:
make_all.bat
UNIX:
./make_all.sh
Configure Alert & Historical Database Connections
The Monitor is delivered with a default memory resident HSQLDB database, which is suitable for evaluation purposes. However, in production deployments, we recommend that you deploy one of our supported databases. For details, see the RTView Core© User’s Guide.
This section describes how to setup an alternate production database, and how to configure the Alert Settings Database connection and the Historian Database connection. You connect and configure the databases using the RTView Configuration Application. You also copy portions of the database.properties template file (located in the common\dbconfig directory) into the RTView Configuration Application.
Monitor Databases
The Monitor requires two database connections that provide access to the following information:
Alert Settings
The ALERTDEFS database contains alert administration and alert auditing information. The values in the database are used by the alert engine at runtime. If this database is not available, the Self-Service Alerts Framework under which alerts are executed cannot work correctly.
Historian
The RTVHISTORY database contains the historical monitoring data to track system behavior for future analysis, and to show historical data in displays.
To Configure the ALERTDEFS and RTVHISTORY Databases:
| 1. | Install a database engine of your choice. Supported database engines are Oracle, Microsoft SQL Server, MySQL, and DB2. |
NOTE: The default page size of DB2 is 4k. It is required that you create a DB2 database with a page size of 8k. Otherwise, table indexes will not work.
| 2. | Open the database.properties template file, which is located in the common\dbconfig directory, find the line that corresponds to your supported database in the "Define the ALERTDEFS DB" section and make a note of this information. Keep the database.properties template file open. |
| 3. | Open the RTView Configuration Application for RTView Manager and go to Databases>CONNECTIONS tab. |
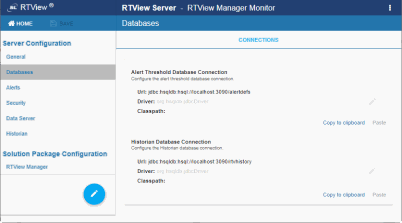
| 4. | Click Alert Threshold Database Connection to open the Edit Connection dialog. |
| 5. | Enter the information (you previously noted from the database.properties file) into the Edit Connection dialog and click Save. |
URL: Enter the full database URL to use when connecting to this database using the specified JDBC driver.
Driver: Enter the fully qualified name of the JDBC driver class to use when connecting to this database.
Classpath: Enter the location of the jar where the JDBC driver resides in your environment.
Username: Enter the username to enter into this database when making a connection.
Password: Enter the password to enter into this database when making a connection.
Run Queries Concurrently: Select this check box to run database queries concurrently.
Click  to close the dialog and
 (in title bar) to save your settings.
| 6. | Return to the database.properties template file, which is located in the common\dbconfig directory, find the line that corresponds to your supported database in the "Define the RTVHISTORY DB" section and make a note of this information. |
| 7. | In the RTView Configuration Application, click the Historian Database Connection to open the Edit Connection dialog. |
| 8. | Enter the information (you previously retrieved from the database.properties file) into the Edit Connection dialog and click Save. |
URL:Enter the full database URL to use when connecting to this database using the specified JDBC driver.
Driver:Enter the fully qualified name of the JDBC driver class to use when connecting to this database.
Classpath:Enter the location of the jar where the JDBC driver resides in your environment.
Username:Enter the username to enter into this database when making a connection.
Password:Enter the password to enter into this database when making a connection.
Run Queries Concurrently:Select this check box to run database queries concurrently.
| 9. | Click  to store the newly added connection and close the dialog and to store the newly added connection and close the dialog and (in title bar) to save your settings. (in title bar) to save your settings. |
| 10. | Click  to apply changes. to apply changes. |
| 11. | Manually create database tables. If your configured database user has table creation permissions, then you only need to create the Alerts tables. If your configured database user does not have table creation permission, then you must create both the Alert tables and the History tables. |
To create tables for your database, use the .sql template files provided for each supported database platform, which is located in the dbconfig directory of the common and solmon directories, where:
<db> ={db2, mysql, oracle, sqlserver}
| • | Alert Settings |
RTViewCentral/rtvapm/common/dbconfig/create_common_alertdefs_tables_<db>.sql
| • | Historian |
RTViewCentral/rtvapm/common/dbconfig/ create_common_history_tables_<db>.sql
RTViewCentral/rtvapm/rtvmgr/dbconfig/create_rtvmgr_history_tables_<db>.sql
NOTE: The standard SQL syntax is provided for each database, but requirements can vary depending on database configuration. If you require assistance, consult with your database administrator.
The most effective method to load the .sql files to create the database tables depends on your database and how the database is configured. Some possible mechanisms are:
| • | Interactive SQL Tool Some database applications provide an interface where you can directly type SQL commands. Copy/paste the contents of the appropriate .sql file into this tool. |
| • | Import Interface Some database applications allow you to specify a .sql file containing SQL commands. You can use the .sql file for this purpose. |
Before loading the .sql file, you should create the database and declare the database name in the command line of your SQL client. For example, on MySQL 5.5 Command Line Client, to create the tables for the Alert Settings you should first create the database:
create database myDBName;
before loading the .sql file:
mysql -u myusername -mypassword myDBName < create_common_alertdefs_tables_mysql.sql;
If you need to manually create the Historical Data tables, repeat the same process. In some cases it might also be necessary to split each of the table creation statements in the .sql file into individual files.
Third Party Application
If your database does not have either of the two above capabilities, a third party tool can be used to enter SQL commands or import .sql files. Third party tools are available for connecting to a variety of databases (RazorSQL, SQLMaestro, Toad, for example).
You have finished configuring the databases. To configure alert notifications, proceed to Configure Alert Notification.
Configure Alert Notification
To configure alert notification for RTView Manager:
| 1. | Open the RTView Configuration Application for RTView Manager, select the RTView Manager project, then select Alerts (in the navigation tree). |
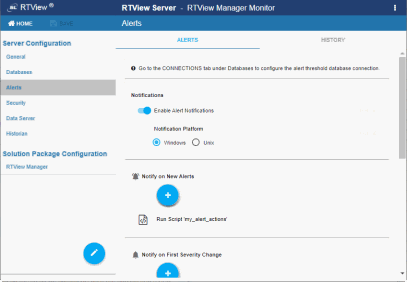
| 2. | See Configure Alert Notification. |
Configure High Availability
To configure HA for RTView Manager, refer to Configure RTViewCentral High Availability instructions.
Troubleshoot
This section includes:
| • | Log Files for RTView Manager |
| • | JAVA_HOME |
| • | Permissions |
| • | Network/DNS |
Log Files for RTView Manager
When any component encounters an error, an error message is output to the console and/or to the corresponding log file. Logging is enabled by default. If you encounter issues with log files, verify the logs directory exists.
RTView Manager Log Files
If you encounter issues, look for errors in the following log files, located in the RTViewCentral/projects/rtview-manager/logs directory:
| • | dataserver.log |
| • | historian.log |
JAVA_HOME
If you encounter issues starting RTView Enterprise or RTView Manager processes on Linux, verify that JAVA_HOME is set correctly in the path as JAVA_HOME is required for Tomcat to start correctly. On Windows, JAVA_HOME or JRE_HOME should exist as environment variables indicating a valid Java path.
Permissions
If you encounter permissions-related errors in the response from the start_servers command, check ownership of the directory structure.
Network/DNS
If any log file shows reference to an invalid URL, check your system’s hosts file and also confirm with your network administrator that you’re not being blocked from accessing the remote system.