Custom Display Designer (CDD)
Use the custom display designer to quickly design and deploy custom displays in your monitor. You open the custom display designer by clicking the  button in the Configuration Application HOME page.
The panel on the left shows a list of your custom displays and the main panel allows you to edit those displays. To get started, click <New> in the display panel to start a new display. Once you have finished editing your display, click the Save button at the top of the display list. Navigate to the monitor and you will see a CUSTOM tab that contains your new display. If you do not see the CUSTOM tab, or you do not see your display in the navigation tree of your CUSTOM tab, click refresh in the monitor. Back in the designer, click <New> to create another new display or select an existing display to continue editing it.
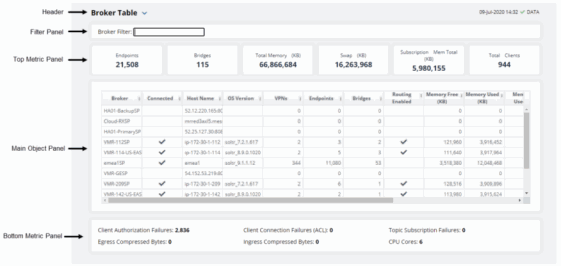
The main panel allows you to edit your display. It is broken into five sections which correspond to the available sections in your custom display:

Tip: Click the ? button in the top right corner of any section to display help text specific to that section.
All Sections are optional and will only be included in the display if configured. The objects in the display can be configured to show data from any available solution package. However, if a display shows data from multiple solution packages, all of those solution packages must be hosted in the same RTViewDataServer.
Location on Disk
Custom displays are stored in your installation under projects/custom/displays. Each display has two files: a .txt file and a corresponding .html file. To copy displays from one monitor to another, copy the whole displays directory into the projects/custom directory of the target monitor. When deployed with HA monitors, custom displays will be saved to the active monitor installation. You will need to copy them over to the backup monitor.
Custom Navigation Tree
By default, all of the displays in the projects/custom/displays directory are shown in the CUSTOM tab of the monitor in a single level navigation tree. This is useful when developing custom displays since you can immediately see your changes in the CUSTOM tab as soon as you save them in the designer. Once you are ready to deploy, you can optionally create a custom navigation tree as follows:
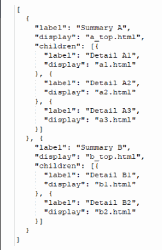
In a text editor, create a file named navtree.json in the projects/custom/displays directory that contains a json array of objects where each object represents a node in the navigation tree and has the following fields:
| • | label: The label to use for the tree node. |
| • | display: The name of the display to use for the tree node with the .html extension. |
| • | children: Optional. An array of the nodes in the subtree expanded when this node is clicked. |
For example, the following defines a two-level navigation tree:

That looks like this

You can also optionally hide or rename the CUSTOM tab as follows. In a text editor, create a file named config.json in the projects/custom/displays directory that contains the following json:
{
"tabLabel":"Your Custom Label",
"visible":true
}
Note that while you are developing displays, you will use the CUSTOM tab to see the displays you are editing. Therefore, you should wait to create a custom navigation tree until you are finished adding new displays. Or add new displays to your custom navigation tree as soon as you start working on them.