Admin Displays
These displays enable you to set alert thresholds, observe how alerts are managed, and view internal data gathered and stored by RTView (used for troubleshooting with SL Technical Support). Displays in this View are:
| • | Alert Administration: Displays active alerts and provides interface to modify, enable and manage alerts. |
| • | Alert Overrides Admin : Set and modify alert overrides. Access this display from the Alert Administration display. |
| • | Cache Table: View cached data that RTView is capturing and maintaining, and use this data use this for debugging with SL Technical Support. |
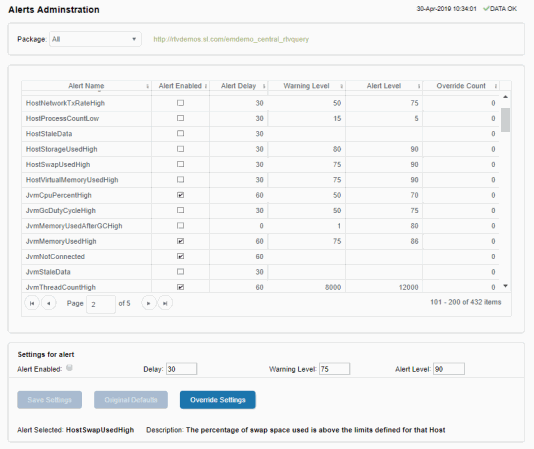
Alert Administration
The Alert Administration display allows administrators to enable/disable alerts and manage alert thresholds. The table describes the global settings for all alerts on the system.
You can set the Delay time (the number of seconds that must pass before an alert is triggered, where 0 sets it to immediately execute).
You can set the Warning Level which executes a single warning alert when the number of seconds specified here is exceeded. To set the warning to occur sooner, reduce the Warning Level value. To set the warning to occur later, increase the Warning Level value.
You can set the Alarm Level which executes a single alarm alert when the number of seconds specified here is exceeded. To set the alarm to occur sooner, reduce the Alarm Level value. To set the alarm to occur later, increase the Alarm Level value.
Note: For low value-based alerts (an alert that executes based on a value going below a certain threshold), to set the alarm to occur sooner you increase the Alarm Level value. To set the alarm to occur later, reduce the Alarm Level value.
You can apply alert thresholds globally or as an override. Setting override alerts allows you to set thresholds for a subset of your resources, or for a single resource (for example, a single server). Override alerts are useful if the majority of your resources require the same threshold setting, but there are a few resources that require a different threshold setting. For example, you might not usually be concerned with execution time at a process level, but perhaps certain processes are critical. In this case, you can apply alert thresholds to each process individually. See below for instructions.
You can filter, sort and choose columns to include by clicking a column header icon (located to the right of each column label) and selecting Filter, Sort Ascending, Sort Descending or Columns. Use the Ack'd and Cleared drop-downs to filter the table by those columns. Right-click on a table cell to Export to Excel.
To set thresholds and enable a global alert:
Select an alert and, under Settings for alert (in the lower portion of the screen), modify settings for the alert Delay, Warning Level and/or Alarm Level and Save Settings. With that alert selected, check the Alert Enabled box under Settings for alert (in the lower portion of the screen) and Save Settings. The Alert Enabled box (next to the selected alert) is now checked.
You can also override the alert duration time per alert index instead of to all indexes. To override the duration for an alert index, select the alert in the Alert Administration display, click Override and edit the Alert Delay. For alert indexes that were overridden in a previous release (before duration override was supported) the override duration is set to -1, indicating that this is set to use the top level alert duration.
To set thresholds and enable an override alert:
To set an override alert, select an alert and click Override Settings to open the Alert Overrides Admin display.
For additional details, see Alert Overrides Admin .
|
|
|
Alert Name |
The name of the alert. |
|
|
|
Alert Enabled |
When checked, the alert is enabled globally. |
|
|
|
Alert Delay |
The amount of time (in seconds) that the value must be above the specified Warning Level or Alarm Level threshold before an alert is executed. 0 is for immediate execution. |
|
|
|
Warning Level |
The global warning threshold for the selected alert. When the specified value is exceeded a warning is executed. |
|
|
|
Alert Level |
The global alarm threshold for the selected alert. When the specified value is exceeded an alarm is executed. |
|
|
|
Override Count |
The number of times thresholds for this alert have been defined individually in the Tabular Alert Administration display. A value of: -0 indicates that no overrides are applied to the alert. -1 indicates that the alert does not support overrides. |
|
|
Settings for alert |
||
|
|
|
Alert Enabled |
Check / uncheck this box to enable or disable the selected alert globally. |
|
|
|
Delay |
Enter the amount of time (in seconds) that the value must be above the specified Warning Level or Alarm Level threshold before the selected alert is executed. 0 is for immediate execution. |
|
|
|
Warning Level |
Enter the global warning threshold for the selected alert. When the specified value is exceeded a warning is executed. To set the warning to occur sooner, reduce the Warning Level value. To set the warning to occur later, increase the Warning Level value. |
|
|
|
Alert Level |
Enter the global alarm threshold for the selected alert. When the specified value is exceeded an alarm is executed. To set the alarm to occur sooner, reduce the Alarm Level value. To set the warning to occur later, increase the Alarm Level value. NOTE: For low value-based alerts (such as EmsQueuesConsumerCountLow), to set the alarm to occur sooner, increase the Alarm Level value. To set the alarm to occur later, reduce the Alarm Level value. |
|
|
|
Save Settings |
Click to apply alert settings for the selected alert. |
|
|
|
Original Defaults |
Click to revert to original alert settings for the selected alert. |
|
|
|
Override Settings |
Click to set an alert override in the Alert Overrides Admin display on the selected alert. |
Alert Overrides Admin
Administrators use this display to override the alert settings defined in the Alert Administration display. To access this display, select an alert in the Alert Administration display and choose Override Settings.
The table lists all the possible overrides that can be defined for the alert you selected from the Alert Administration display. Each row in the table represents a different resource or group of resources that can be overridden. When the four last columns are blank, that means the resource has not been overridden, and the default settings for the alert apply. Otherwise, columns describe whether the alert is enabled, if the override itself is enabled, the overridden alert thresholds and the overridden duration for each row.
Use the Override Type drop-down menu to switch the list to a specific type of override (the options for this menu vary according to the alert type), and use the Display drop-down menu to list All resources, Overridden resources or Free resources.
You can also enter a pattern or regular expression in the Search string to limit the list.
The RegEx checkbox indicates whether the text you entered is treated as a search pattern or as a regular expression. Multiple rows can be selected to create/edit/remove many overrides simultaneously.
You can filter, sort and choose columns to include by clicking a column header icon (located to the right of each column label) and selecting Filter, Sort Ascending, Sort Descending or Columns. Use the Display drop-down to filter the table to show All resources, only resources with the Overridden alert applied or Free resources (to show only resources without the alert override applied). Right-click on a table cell to Export to Excel or Copy Cell Value.
To set overrides:
Select an Override Type from the drop-down menu (depending on the alert, there might be only one type) and then select one or more rows from the table. Under Settings for selected index (in the lower portion of the screen), modify settings for the Override Enabled, Alert Enabled, Alert Delay, Warning Level and/or Alarm Level, then click Add Override. The table updates with your new settings.
To alter overrides:
To alter existing overrides with new settings, select them from the table, set all properties under Settings for selected index as desired, then click Save Settings. To clear existing overrides, select one or more rows, then click Remove Override.
Note: You can override alert and warning levels without overriding duration by setting it to -1.
For alert indexes that were overridden in a previous release (before duration override was supported) the override duration is set to -1, indicating that this is set to use the top level alert duration.
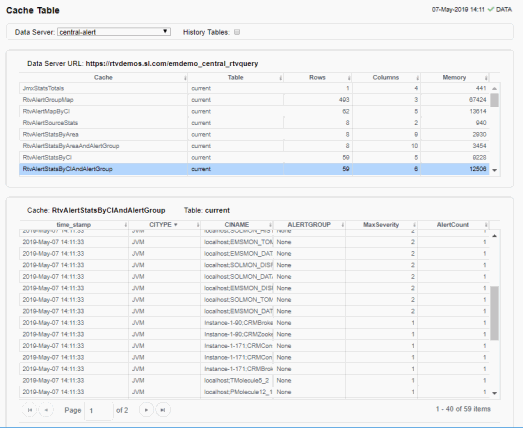
Cache Table
View the raw data that RTView is capturing and maintaining to investigate utilization and capacity metrics, as well as connection details, for caches on a data server.
Select a Data Server from the drop-down menu. The upper table contains a row of data for each cache on the selected data server. You can see the current number of Rows and Columns in each table and the amount of Memory used. You can also find out the cache Table type of which there are five:
| • | current tables show the most recently received values for each index. |
| • | current_condensed tables are current tables with primary compaction configured. |
| • | history tables show the historical values for each index. |
| • | history_condensed tables are history tables with primary compaction configured. |
| • | history_combo tables are history tables with primary compaction configured, and which is also configured to store rows of recent raw data followed by rows of older condensed data. |
Select a cache to see connection utilization details for that cache in the lower table. The lower table shows the contents of the selected cache table. Available columns vary by cache. For example, a JVM cache table might provide BootClassPath and InputArgument columns, and a Tomcat cache might provide RateAccess and cacheMaxSize columns.
You can search, filter, sort and choose columns to include by clicking a column header icon (to the right of each column label) and selecting Filter, Sort Ascending, Sort Descending or Columns. Or just click a column header to sort.
Right-click on a table cell to Export to Excel or Copy Cell Value. Use Ctrl + click or Shift + click to select multiple alerts. Use History Tables to include / exclude history tables in the table. Right-click on a table cell to Export to Excel or Copy Cell Value.
This low-level option can be useful to identify the source of the problem when the displays are not showing the expected data. Use this data for debugging and troubleshooting with Technical Support.