Choose and Setup an Application Server
RTViewCentral requires an application server. You have three options:
| • | Using the Pre-configured Apache Tomcat Installation: RTViewCentral includes a pre-configured Apache Tomcat installation which can be used to host all necessary servlets. This option allows you to Integrate LDAP with Tomcat and HTML UI. This is the default setup. |
| • | Using Jetty: RTViewCentral can host all necessary servlets in the CentralServer using Jetty. |
| • | Using An Alternate Application Server: You can use your own Application Server. In this case, you need to deploy all necessary servlets to your application server and add the required roles. |
Using the Pre-configured Apache Tomcat Installation
RTViewCentral includes a pre-configured Apache Tomcat installation which hosts all of the servlets necessary to run the Monitor on port 8068.
You can optionally change user names and passwords for the servlets hosted in Tomcat in RTViewCentral/apache-tomat*sl/conf/tomcat-users.xml. The user names and passwords in this file can be changed, but you cannot modify the roles as these are required by the servlets.
Note: The Apache Tomcat bin directory is not copied when executing the upgrade_rtv.bat|sh script, as the conf directory is. If you wish to modify the Java options used by Apache tomcat, or make other environment settings, make your changes to bin/rtvcust_setenv.bat|sh instead. These files are copied by the upgrade_rtv.bat|sh scripts, and thus customized changes within them are not lost.
You can optionally Integrate LDAP with Tomcat and HTML UI.
Integrate LDAP with Tomcat and HTML UI
This section describes how to setup Tomcat so that you can log into RTView applications using your LDAP username and password and automatically associate that with an RTView role (for example, rtvadmin, rtvuser, and so forth). This feature uses Apache Tomcat’s built-in LDAP integration, the JNDI Realm.
To integrate LDAP with Tomcat and the HTML UI you edit two configuration files. Then, when a user logs into RTView, it is located in the directory and authenticated using the given password. Users can be located by a direct name-to-DN association or by searching for a specified attribute. You can search using the credentials of the given user or supply a connectionName and connectionPassword and search using those credentials.
Tip: The connectionPassword value may be encoded using the RTView utility encode_string. Edit server.xml and use the encoded password as the value of the connectionPassword property. When Tomcat is started the connection password will be decrypted and used along with the connection name to bind to the directory and locate the user who is attempting to log in.
After a user is authenticated, they are associated with an RTView role according to the entries in the rtview-roles.txt file. Users given the role:
| • | rtvuser will be able to log into the HTML UI. |
| • | rtvadmin will be able to log into the Configuration Application. |
| • | rtvalertmgr will be able to manage alerts. |
Note that you must restart the Tomcat server after editing server.xml but it is not necessary to restart it after editing rtview-roles.txt.
To setup LDAP integration:
| 1. | Open the server.xml file, located in the TOMCAT_HOME/conf directory. |
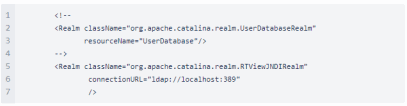
| 2. | Comment out this section: |
<Realm className="org.apache.catalina.realm.UserDatabaseRealm" and uncomment the section <Realm className="org.apache.catalina.realm.RTViewJNDIRealm"
The result should look like this:
| 3. | Specify your LDAP server connection information and other LDAP options. |
| 4. | Restart the Tomcat server. |
| 5. | Open the rtview-roles.txt file, located in the TOMCAT_HOME/confdirectory, to specify your role-to-attribute mappings. |
Refer to Tomcat JNDI Realm documentation for additional information and the following examples below.
Example 1
You have four users in a container named Users. You want to find them by name and associate each one with RTView roles. Tom needs the rtvadmin role. Nancy needs both the rtvadmin and rtvalertmgr roles. Joe and Susan need the rtvuser role. To set these up you edit the files as follows:
| • | In server.xml you include: |
userPattern="CN={0},CN=Users,DC=mycompany,DC=com"
| • | In rtview-roles.txt you include: |
rtvadmin:CN=Tom,CN=Users,DC=mycompany,DC=com
rtvadmin,rtvalertmgr:CN=Nancy,CN=Users,DC=mycompany,DC=com
rtvuser:CN=Joe,CN=Users,DC=mycompany,DC=com
rtvuser:CN=Susan,CN=Users,DC=mycompany,DC=com
Example 2
Your groups are in a container named Roles. You want any members of the Administrators group to get the rtvadmin and rtvuserroles. You also want any members of the Usersgroup to get the rtvuserrole. To set these up you edit the files as follows:
| • | In server.xml you include: |
userPattern="CN={0},CN=Users,DC=mycompany,DC=com"
userRoleName="memberOf"
| • | In rtview-roles.txt you include: |
rtvadmin,rtvuser:CN=Administrators,CN=Roles,DC=mycompany,DC=com
rtvuser:CN=Users,CN=Roles,DC=mycompany,DC=com
For additional details, refer to Apache Tomcat JNDI Realm documentation.
Proceed to Start RTViewCentral.
Using Jetty
RTViewCentral can host all necessary servlets in the CentralServer using Jetty on port 10070.
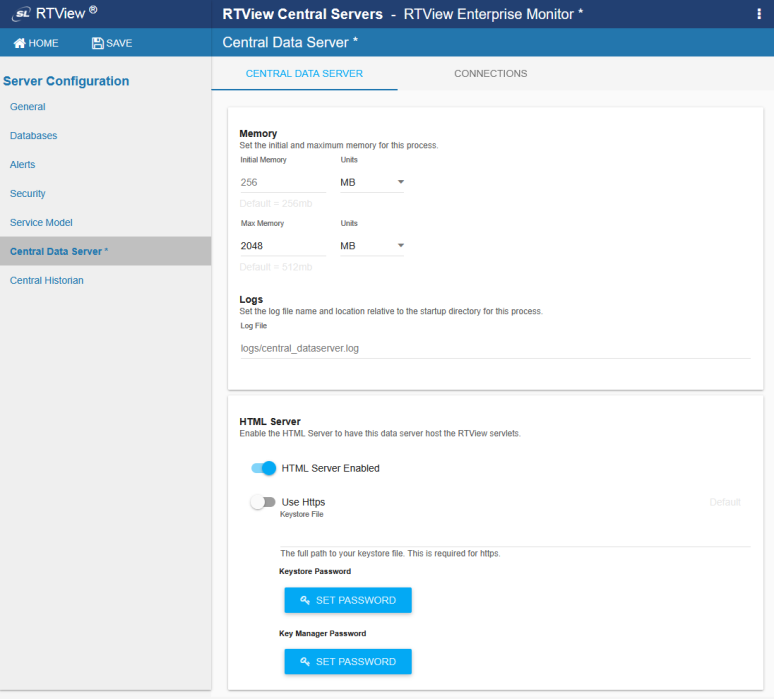
To enable Jetty, open the Configuration Application on Tomcat (http://localhost:8068/rtview-central-rtvadmin), go to the Central Data Server tab and turn on HTML Server Enabled. Save and RESTART SERVERS to apply your changes. Now the Configuration Application can be accessed via Jetty on port 10070.
You can optionally change user names and passwords for the servlets hosted in the Jetty server in RTViewCentral/rtvapm/common/lib/ext/jetty/rtvadmin-users.xml. The user names and passwords in this file can be changed, but you cannot modify the roles as these are required by the servlets.
Proceed to Start RTViewCentral.
Using An Alternate Application Server
To use your own application server:
| 1. | In a windows command prompt or UNIX terminal, go to RTViewCentral/rtvapm and execute rtvapm_init.bat (Windows) or ./rtvapm_init.bat (UNIX). |
| 2. | Change directory (cd) to RTViewCentral/projects/rtview-server and execute update_wars.bat (Windows) or update_wars.sh (UNIX). |
| 3. | Deploy the resulting war files to your application server. |
| 4. | If you are using RTView Manager, repeat steps 2 and 3 in the projects/rtview-manager directory. |
| 5. | Add the following users to your application server: rtvuser, rtvadmin and rtvalertmgr. |
| 6. | The instructions in this document refer to the custom Tomcat port, 8068. When following instructions, use your application server's host and port instead. |
Proceed to Start RTViewCentral.