The Historian
Requirements
The steps described in this section are for a Historian configuration in which RTView display (.rtv) files were used for the Historian Data Configuration file. For information, see Configuring the Historian.
The SQL data source is required to view data from the Historian in RTView. Verify that the SQL data source is licensed in your installation in the Display Builder About dialog.
This example requires that you have a working knowledge of RTView. If you would like to work through a basic example, please complete the Quick Start Tutorial before continuing.
Objectives
| • | Create a configuration file for the Historian |
| • | Run the Historian with this configuration file |
| • | Create and view a display file which shows data from the Historian |
| • | Create a configuration file that will cause the Historian to store your tabular data to a new table in the history database |
| • | Run the Historian with this configuration file to create and view a display file which shows the new table of data |
Note: This example uses the XML data source to illustrate the features listed below. Even if you will not be using XML data, we suggest you complete this exercise in order to learn basic concepts of archiving and viewing historical data.
Getting Started
This example assumes that you have a database to which the Historian will store data. If you have not already completed Database Connection Configuration, you must do so before continuing.
In an initialized command/terminal window (see Initializing a Command Prompt or Terminal Window ):
| 1. | Start the XML Data Simulator |
| 2. | Start the Display Builder |
You must initialize each new terminal window you open. See the Setup and Registration section for more details about setting up your environment.
Application Options
| 1. | In the Display Builder, select Tools>Options to open the Application Options dialog. |
| 2. | Select the XML Tab and click on Add. |
| 3. | In the Edit XML Source dialog: |
XML Source Name - Enter update.xml
| 4. | Click OK to add the XML source. |
| 5. | Click on the SQL Tab and select Add Database. |
| 6. | In the Add Database dialog: |
Database Name - Enter RTVHISTORY
Enter a JDBC Driver Class Name and JDBC Database URL. See the Application Options - SQL page in the Data Sources section of this documentation for more details.
| 7. | Click OK to add this database. |
| 8. | Click Save to save these options and select No in the confirmation dialog. |
Create a Configuration File to Store Historical Data
In this section you will add two meters to a display. The data you attach to these meters will be used by the Historian to store data in the history database.
| 1. | Select Edit>Add. |
| 2. | In the Object Palette window, select the Meters tab and add the first meter in the palette (class name: obj_meter20) to the display. |
| 3. | In the Object Properties dialog: |
label - change to Data. Press <Enter>.
value - Right-click in the Property Name field and select Attach to Data>XML.
| 4. | In the Attach to XML Data dialog: |
XML Source - update.xml should already be selected.
Data Key - Select element1_data from the drop down menu.
| 5. | Click OK to apply these values and close the Attach to XML Data dialog. |
| 6. | Select the Element 1 Data meter and click the Copy button  . . |
| 7. | Click the Paste button |
| 8. | Click to place the new meter. |
| 9. | In the Object Properties dialog: |
label - change to Load. Press <Enter>.
value - Right-click in the Property Name field and select Attach to Data>XML.
| 10. | In the Attach to XML Data dialog: |
XML Source - update.xml should already be selected.
Data Key - Select element1_load from the drop down menu.
| 11. | Click OK to apply these values and close the Attach to XML Data dialog. |

| 12. | Select File>Save and name this file tutorial_history_config.rtv. |
Store Historical Data
| 1. | Start the Historian: |
On Windows
In an initialized Windows command window (see Initializing a Command Prompt or Terminal Window ), type:
start run_historian
On UNIX
In an initialized terminal window (see Initializing a Command Prompt or Terminal Window ), type:
run_historian &
| 2. | Click Add on the Configuration tab. |
| 3. | Select tutorial_history_config.rtv |
| 4. | Click Open to insert into the Data Configuration Files list. |
| 5. | Select the Show Data in Console check box. |
This prompts the Historian to print a line to the console for each record it stores to the history database.
If you are using a direct JDBC connection, enter a JDBC Driver Class Name and JDBC Database URL. See Historian Application Configuration for details. You must enter the same configuration settings you entered in the Add Database dialog.
| 6. | Click Save Configuration to save these settings. |
| 7. | Select the Console tab. |
| 8. | Click Start Storing Data. |
Data will immediately start printing to the console window.
Note: Let the Historian run as you go through the next section.
View Historical Data
In this section you will create a display with a graph that loads initial data from the history database and then updates with live XML data. You will also add a table that will show all data from a table in the history database.
| 1. | In the Display Builder, click on the New  button. button. |
| 2. | In the Object Palette window, select the Graphs tab and add the second graph in the palette (class name: obj_trendgraph02) to the display. |
| 3. | In the Object Properties dialog: |
objWidth - Increase to 500. Press <Enter>.
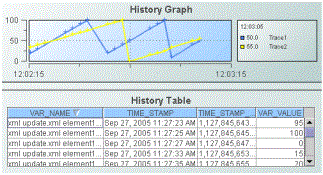
label - Change to History Graph. Press <Enter>.
trace1ValueHistoryFlag - Select the check box.
trace2ValueHistoryFlag - Select the check box.
Selecting these check boxes indicates that, if available, initial values for the graph should be read from the Historian.
trace1Value - Right-click in the Property Name field and select Attach to Data>XML.
| 4. | In the Attach to XML Data dialog: |
XML Source - update.xml should already be selected.
Data Key - Select element1_data from the drop down menu.
| 5. | Click OK to apply these values and close the Attach to XML Data dialog. |
| 6. | In the Object Properties dialog: |
trace2Value - Right-click in the Property Name field and select Attach to Data>XML. This attaches the second trace to data.
| 7. | In the Attach to XML Data dialog: |
XML Source - update.xml should already be selected.
Data Key - Select element1_load from the drop down menu.
| 8. | Click OK to apply these values and close the Attach to XML Data dialog. |
Data attachments in the History Graph now match the data attachments on the meters in the configuration display file you saved as tutorial_history_config.rtv.
| 9. | Select File>Save and name this file tutorial_history_display.rtv. |
When you open this display, the graph will load initial data from the history database and will continue to update as live XML data comes in.
| 10. | Select File>Open to reopen the display (.rtv) file you saved as tutorial_history_display.rtv. |
| 11. | In the Object Palette window, select the Tables tab and add the first table in the palette (class name: obj_table02) to the display. |
| 12. | In the Object Properties dialog: |
objWidth - Increase to 500. Press <Enter>.
label - Change to History Table. Press <Enter>.
valueTable - Right-click in the Property Name field and select Attach to Data>SQL.
| 13. | In the Attach to SQL Data dialog: |
Database Name - RTVHISTORY should already be selected.
Table Name - Select HISTORY from the drop down menu.
Column(s) - Select * from the drop down menu.
| 14. | Click OK to apply these values and close the Attach to SQL Data dialog. |
The table will now display the entire HISTORY table from the history database.
Setup Database to Store Historical Tabular Data
In this section, you will need to add a table to the history database. If necessary, contact your database administrator to complete the next section.
| 1. | Exit the Historian and Display Builder. |
| 2. | Add a table named production_archive to the history database. |
| 3. | Add the following columns to that table: |
|
Field Name |
Field Type |
|
RowName |
Text (10 characters) |
|
Plant |
Text (30 characters) |
|
UnitsInProduction |
Number |
|
UnitsCompleted |
Number |
|
Status |
|
|
OnSchedule |
Text (10 characters) |
|
TimeStamp |
Text (30 characters) |
|
TimeStampLs |
Text (30 characters) |
Create a Configuration File to Store Historical Tabular Data
In this section, you will add a table to a display. The data you attach to this table will be used by the Historian to store data in the production_archive table you created in the history database.
| 1. | Start the Display Builder in your original, initialized command/terminal window. |
| 2. | Select Edit>Add to open the Object Palette. |
| 3. | Select the Tables tab and add the first table in the palette (class name: obj_table02) to the display. |
| 4. | In the Object Properties dialog: |
label - Change to Production Data. Press <Enter>.
objWidth - Increase to 500. Press <Enter>.
valueTable - Right-click in the Property Name field and select Attach to Data>XML.
| 5. | In the Attach to XML Data dialog: |
XML Source - update.xml should already be selected.
Data Key - Select production_table from the drop down menu.
Column(s) - Select * from the drop down menu.
| 6. | Click OK to apply these values and close the Attach to XML Data dialog. |

| 7. | In the Object Properties window: |
historyTableName - Type production_archive in the Property Value field. Press <Enter>.
historyTableRowNameFlag - Select the check box.
When you enter production_archive in the Property Value field, you are telling the Historian which table in your history database to store the tabular data in. Selecting the historyTableRowNameFlag check box tells the Historian to store the data from the row name field into the first column in the production_archive table in your history database.
| 8. | Select File>Save and name this file tutorial_history_table_config.rtv. |
Store Historical Tabular Data
| 1. | Restart the Historian: |
On Windows
In an initialized Windows command window (see Initializing a Command Prompt or Terminal Window ) type:
start run_historian
On UNIX
In an initialized terminal window (see Initializing a Command Prompt or Terminal Window ) type:
run_historian &
| 2. | Click Add on the Configuration tab. |
| 3. | Select tutorial_history_table_config.rtv |
| 4. | Click Open to insert into the Data Configuration Files list. |
The Show Data in Console flag should already be checked. This prompts the Historian to print a line to the console for each record it stores to the database.
| 5. | Click Save Configuration to save these settings. |
| 6. | Click on the Console tab. |
| 7. | Click Start Storing Data. |
Data will immediately start printing to the console window.
Note: Let the Historian run as you go through the next section.
View Historical Tabular Data
| 1. | In the Display Builder, click on the New  button. button. |
| 2. | In the Object Palette window, select the Tables tab and add the first table in the palette (class name: obj_table02) to the display. |
| 3. | In the Object Properties dialog: |
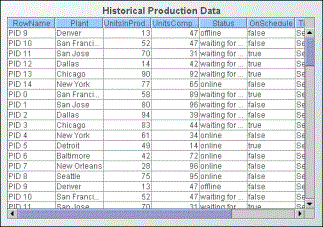
label - Change to Historical Production Data. Press <Enter>.
objWidth - Increase to 500. Press <Enter>.
objHeight - Increase to 350. Press <Enter>.
valueTable - Right-click in the Property Name field and select Attach to Data>SQL.
| 4. | In the Attach to SQL Data dialog: |
Database Name - RTVHISTORY should already be selected.
Table Name - Select production_archive from the drop down menu.
Column(s) - Select * from the drop down menu.
| 5. | Click OK to attach data and close the Attach to SQL Data dialog. |
| 6. | Select File>Save and name this file tutorial_history_table_display.rtv. |
| 7. | Exit the Historian, Display Builder, and XML data simulator. |