Thin Client Browser with Direct Data Connection
The Thin Client Browser with Direct Data Connection deployment involves deploying only one Display Server. The Display Server will have a direct connection to all required data sources and will be responsible for serving dashboards, performing data calculations, caching data and processing alerts.
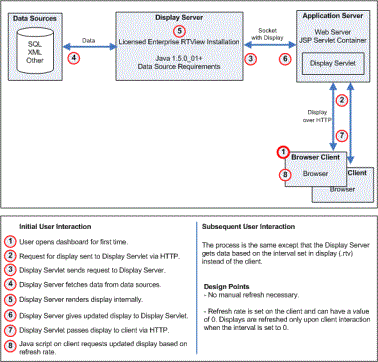
How It Works
Deployment Process Overview
The following is an overview of how to deploy the Thin Client Browser with Direct Data option of RTView. The steps need to be followed in the order given.
See How It Works for a Thin Client Browser with Direct Data system overview and sequence of usage.
Note: This documentation is intended for users with a working knowledge of HTML code and application server administration. If you do not have a full understanding of these topics, you will need assistance from your system administrator.
Process Summary
Step 1: Install and Configure Display Server
Step 2: Configure and Install Display Servlet
A: Create Display Servlet HTML or JSP Files
B: Configure Display Servlet Options
Step 3: Configure and Install Display Server Portlet (Optional)
Setup
This section provides step-by-step instructions on how to deploy RTView. The steps must be done in the order given. Refer to Deployment Process Overview for a summary of these instructions.
This section is intended for users with standard working knowledge of HTML, JSP and servlet deployment on an application server.
An Apache Tomcat application server is included with your RTView installation for prototyping and testing your deployment before going into the production environment. The following instructions will work for your application server or the one that comes with RTView.
Step 1: Install and Configure Display Server
Install RTView on the system where you will run the Display Server.
A: Verify System Requirements
| • | Basic system requirements |
| • | In addition to basic system requirements, refer to the Data Sources section of this documentation for system requirements and setup specific to your data source. |
B: Install Display Server
At this point you have verified your system requirements.
| 1. | Install RTView (see Installation) |
| 2. | Setup RTView (see Setup) |
C: Register
At this point you have verified your system requirements and installed the Display Server.
Register for a license (see Registration) to run the Display Server.
D: Configure Display Server
At this point you have verified your system requirements, and installed and registered RTView.
| 1. | Create a project directory to store Display Server configuration files. |
| 2. | Copy the following files into this directory from the project directory where you developed your RTView application: |
| • | All display (*.rtv) files |
| • | Style sheet (.rts) files (optional) |
| • | OPTIONS.ini. See Application Options for more information. |
| • | COLORS.ini (only required if Custom Colors have been defined). See Custom Colors Tab for more information. |
| • | Refer to Deployment in the Data Sources section of this documentation for information on configuration (.ini) files specific to your data sources. |
| • | Panel configuration file (optional). See Multiple Display Panels for more information. |
| • | Security Configuration files (optional). See Configuration for more information. |
| • | DISPLAYSERVER.ini |
Note: If you have no DISPLAYSERVER.ini file, create one now by configuring your Display Server application options. Otherwise, go to Step 2: Configure and Install Display Servlet .
| 3. | Configure your Display Server application options. See RTView Core® User’s Guide Version 7.6 for information on how to specify your options. All configuration files should be saved in the directory you just created. |
Step 1 is completed. Go to Step 2: Configure and Install Display Servlet.
Step 2: Configure and Install Display Servlet
At this point you have completed the RTView installation and setup.
About Display Servlet
The Display Server uses the Display Servlet, which is a JSP servlet that runs on your application server. Clients communicate with the Display Servlet using HTTP. The Display Servlet communicates with the Display Server via socket to request HTML for display in the browser. The servlets\rtvdisplay directory contains files (JSP, HTML, classes, properties) necessary to install the Display Servlet.
A: Create Display Servlet HTML or JSP Files
The Display Servlet comes with a few HTML files for testing. You can use these to deploy, or you can create your own HTML or JSP files which make calls to the Display Servlet to show your displays. See RTView Core® User’s Guide Version 7.6 and RTView Core® User’s Guide Version 7.6 for more information.
Skip this step and go to Step B: Configure Display Servlet Options if both of the following are true:
| • | You will only be deploying one Display Server application on your application server |
| • | You want to deploy using only the test HTML files that come with the Display Servlet |
Note: If you skip this step, use servlets\rtvdisplay as your project directory referenced in Steps B and C, and use rtvdisplay for the appname argument for all of the scripts.
Otherwise, proceed with the following steps.
| 1. | 1. Create a project directory to store your Display Servlet files. |
| 2. | Copy rtvdisplay.properties into this directory from servlets\rtvdisplay. |
| 3. | Create the HTML files or JSP files for your Display Server application. |
| 4. | Copy these HTML or JSP files and any referenced files (e.g., images referenced in the HTML files) to this directory. |
B: Configure Display Servlet Options
The Display Servlet reads rtvdisplay.properties to get configuration information. If you have not installed the Display Servlet, modify the rtvdisplay.properties files in your project directory and it will be installed as part of the next step. If you have already installed the Display Servlet on your application server, you can edit this properties file in your application server. You may need to restart your application server after making changes to this file.
Use servlets\rtvdisplay as your project directory if you skipped Step A: Create Display Servlet HTML Files.
Set the your options in rtvdisplay.properties as specified in RTView Core® User’s Guide Version 7.6.
C: Install Display Servlet
At this point you have completed Display Servlet setup.
Tip: If you skipped A: Create Display Servlet HTML or JSP Files , skip to step 2 and use servlets\rtvdisplay as your project directory. Otherwise, use the project directory that you setup in Step A.
Warning! If you will be running multiple Display Server applications on the same application server, each application must have a unique name.
| 1. | If you made any changes to rtvdisplay.properties, in an initialized command window (see Initializing a Command Prompt or Terminal Window ), go to your project directory and type: |
|
custom_rtvdisplay_war appname |
This script creates a web archive (.war) that includes all of the files necessary to run the Display Servlet, along with all .html, .js, .gif, and .jpg files from the current directory. Warning! If you specify rtvdisplay as the appname, you will overwrite the template display servlet. Even if you are only editing rtvdisplay.properties, it is recommended that you use a unique appname. If there are other files you would like to include in your web archive, add them to the following line in the bin\custom_rtvdisplay_war script: jar uf %1.war *.html *.jpg *.gif *.js *.jsp WEB-INF Note: You may receive an error message if the script does not find at least one of each of the file types specified (.html, .jpg, etc). Disregard this error message. |
| 2. | Your RTView installation includes an Apache Tomcat application server so that you can prototype and test your deployment before moving it to your production server. If you will be using this application server, run the following script to install the Display Servlet: |
|
install_to_demoserver appname |
This script installs the web archive to the Apache Tomcat server included in your RTView installation. Note: This script will shutdown and restart Apache Tomcat and requires administrative permissions. |
| 3. | If you will be using your own Apache Tomcat application server, run the following script to install the Display Servlet: |
|
install_to_tomcat appname |
This script installs the web archive to your Apache Tomcat server. Note: This script will shutdown and restart Apache Tomcat and requires administrative permissions. |
| 4. | If you will be using an application server other than Apache Tomcat, install the files in the web archive to your application server according to the documentation for that product. |
Step 2 is completed. Go to Step 3: Configure and Install Display Server Portlet (Optional).
Step 3: Configure and Install Display Server Portlet (Optional)
At this point you have setup the Display Server and the Display Servlet.
The Display Server can optionally be deployed as a portlet. The portlet is tested in Liferay and contains configuration files specific to Liferay, but should work with any JSR-168 compliant portal. If you want to deploy the Display Server as a servlet, skip this step and go to Step 4: Run Display Server.
Configure install and instance the Display Server Portlet as described in RTView Core® User’s Guide Version 7.6.
Step 3 is completed. Go to Step 4: Run Display Server.
Step 4: Run Display Server
At this point you have setup the Display Server and the Display Servlet, and (optionally) setup the Display Server Portlet.
A: Start Display Server
| 1. | Start the Display Server. Open an initialized command window (see Initializing a Command Prompt or Terminal Window ) and go to the directory created in Step 1 and type: |
run_displayserver
Java options specified in RTV_JAVAOPTS are used by the run_displayserver scripts.
See Command Line for available command line options.
Note: The Display Server is instrumented with JMX to allow you to manage and monitor the display cache and application settings. See RTView Core® User’s Guide Version 7.6 for more information.
Step 4 is completed. Go to Step 5: Test Client.
Step 5: Test Client
At this point you have setup and started the Display Server, and setup and installed the Display Servlet.
| 1. | Open a browser and navigate to the URL for the Display Servlet you set up in Step 2. For example: |
|
http://host:8080/rtvdisplay/index.html |
Where host and port are correct for the application server hosting the Display Servlet. |
| 2. | Login to the Display Server. By default, the Display Server does not require a login. Login can be enabled in the Display Servlet to support Role-based Security. If login is enabled, the default user name and password are: |
User Name: admin
Password: admin
Note: It is possible that your system administrator may have configured another user name and password. In this case, you may also need to select a role. See Role-based Security for more information.
Problem: An error message appears in the browser.
Solution: Check the command window where you started the Display Server as well as the Display Servlet log file on your application server.
See RTView Core® User’s Guide Version 7.6 and RTView Core® User’s Guide Version 7.6 for more information.
Congratulations! RTView deployment is completed.