Application with Direct Data Connection
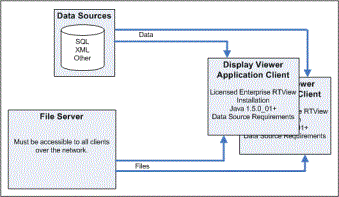
The Application with Direct Data Connection deployment involves providing access to the Display Viewer Application for all clients which need to view displays. This could be done by either doing individual installs on each client or sharing an install with a central platform. Each individual client must be configured so that it can have direct access to data sources. This may involve the installation of additional software such as database drivers or middleware components depending on the data source types used (see Figure 7).

Figure 7: Application with Direct Data Connection Deployment Overview
Deployment Process Overview
The following is an overview of how to deploy the Application with Direct Data Connection option of RTView.
Note: This documentation is intended for users with a working knowledge of HTML code. If you do not have a full understanding of these topics, you will need assistance from your system administrator.
Process Summary
Step 2: Install and Setup Client
Setup
This section provides step-by-step instructions on how to deploy RTView. Refer to Application with Direct Data Connection for a summary of these instructions.
Step 1: Setup File Server
Note: Instead of using a file server, you may install your project files onto each client machine. Using a file server allows you to update project files in a single location but is not required.
| • | All clients must be able to map a drive to this system. |
At this point you have verified your system requirements.
| 1. | Create a shared project directory to store files for the application. |
| 2. | Copy the following files into this directory from the project directory where you developed your RTView application: |
| • | Display (.rtv) files |
| • | Style sheet (.rts) files (optional) |
| • | Panel configuration file (optional). See Multiple Display Panels for more information. |
| • | .jar file containing custom classes (optional) |
| • | Security configuration files (optional). See Configuration for more information. |
| • | OPTIONS.ini. See Application Options for more information. |
| • | COLORS.ini (only required if Custom Colors have been defined). See Custom Colors Tab for more information. |
| • | Refer to Deployment in the Data Sources section of this documentation for information on configuration (.ini) files specific to your data sources. |
You have finished Step 1. Go to Step 2: Install and Setup Client.
Step 2: Install and Setup Client
At this point you have setup the file server.
| • | Basic System Requirements |
| • | In addition to basic system requirements, refer to the RTView Data Sources section of this documentation for system requirements and setup specific to your data source. |
Note: Instead of installing RTView on each client system, you can install it only on the file server and have all clients share the installation by running it over a mapped drive. Using a single installation allows you to upgrade your RTView version on a single system. Each client must still register.
| 1. | Install RTView. See Installation for more information. |
| 2. | Setup RTView. See Setup for more information. |
At this point you have installed and setup RTView.
Register for a license for the Display Viewer. See Registration for more information.
You have finished Step 2. Go to Step 3: Test Client.
Step 3: Test Client
At this point you have setup the file server and the client.
| 1. | In an initialized command window (see Initializing a Command Prompt or Terminal Window ), go to the project directory on the file server and: |
type run_viewer
Note: If no file is specified on the command line (on Windows or UNIX), the Display Viewer Application opens init.rtv. If the file init.rtv is not found, a blank display opens. Once the Display Viewer Application is open, you can access display files by selecting File>Open.
Note: Application options set on the command line will override values in initialization files. See Command Line for more information on using command line parameters.
| 2. | Login. By default, the Display Viewer requires a login to support Role-based Security. If your system administrator has configured a user name and password for you, use those. You may also need to select a role. Otherwise, the default user name and password are: |
User Name: admin
Password: admin
Congratulations! RTView deployment is completed.