Application with Served Data
The Application with Served Data deployment involves providing access to the Display Viewer Application for all clients which need to view displays. This could be done by either doing individual installs on each client and sharing an install with a central platform. The Data Server is installed on a server to provide access to all defined data sources and deliver the federated and cached data via XML to the appropriate Display Viewer Applications (see Figure 6). When you deploy RTView as an Application with Served Data, depending on the command, commands are executed either on the server or the client. See command descriptions for information on where commands are executed.
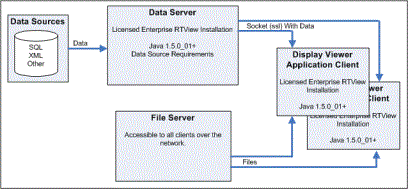
Figure 6: Application with Served Data Deployment Overview
Deployment Process
The following is an overview of how to deploy the Application with Served Data option of RTView.
Process Summary
Step 1: Install and Configure Data Server
E: Set up RTVAgent Servlet on Application Server (Optional)
F: Set up RTVPost Servlet on Application Server (Optional)
Step 3: Install and Setup Client
Step 4: Start / Run Data Server
Setup
This section provides step-by-step instructions on how to deploy RTView.
Step 1: Install and Configure Data Server
Install RTView on the system where you will run the Data Server. If you are using multiple or high availability Data Servers, you will need to repeat the following steps on each system where you will run Data Server(s). See Data Server Tab and Data Server for more information.
| • | Basic System Requirements |
| • | In addition to basic system requirements, refer to the Data Sources section of this documentation for system requirements and setup specific to your data source. |
| • | Data Server must be accessible via network to all clients. |
Note: All clients must have permission to access the Data Server on the port specified for the socket in the DATASERVER.ini file (see Step D).
At this point you have verified your system requirements.
| 1. | Install RTView. See Installation for more information. |
| 2. | Setup RTView. See Setup for more information. |
At this point you have installed and setup RTView.
Register for a license for the Data Server. See Registration for more information.
At this point you have installed, setup, and registered your RTView installation.
| 1. | Create a project directory to store Data Server configuration files. |
| 2. | Copy the following files into the directory you just created from the project directory where you developed your RTView application: |
| • | OPTIONS.ini |
| • | Refer to Deployment in the Data Sources section of this documentation for information on configuration (.ini) files specific to your data sources. |
| • | All display (.rtv) files you want to preload (optional) |
| • | Style sheet (.rts) files (optional) |
Note: If you are using multiple or high availability Data Servers, each Data Server needs to run on a different host and/or port. Be sure that the DATASERVER.ini file, the OPTIONS.ini file, and any related data source initialization files are all correct for this instance of the Data Server. See Data Server Tab and Data Server for more information.
| 3. | If you already created a DATASERVER.ini that is configured to run the Data Server in socket mode on the correct port, copy the DATASERVER.ini to the project directory you just created. Then go to Step 2: Setup File Server. |
If you have not created a DATASERVER.ini, go to next step.
| 4. | In an initialized command window (see Initializing a Command Prompt or Terminal Window ), go to the project directory you created and type: |
run_dataserver -socket
| 5. | Setup the Data Server configuration. See Configuration Tab for more information. |
The Data Server must be configured to run on a socket. The port specified for the socket must match the port specified for the Data Server in Step 2B-5.
| 6. | Click the Save Configuration button to save DATASERVER.ini and exit the Data Server. |
E: Set up RTVAgent Servlet on Application Server (Optional)
Note: This step is only required if you are setting up the Data Server to accept RTVAgent data via HTTP or HTTPS.
At this point you have installed and setup RTView and configured the Data Server.
| 1. | Verify System Requirements |
| • | Application server with a JSP servlet container, such as Apache Tomcat. |
| 2. | Install and Setup RTVAgent Servlet |
The Data Server uses the RTVAgent Servlet that runs on your application server to access data sent from an RTVAgent application that is sending data via HTTP. The servlets\rtvagent directory contains all of the files necessary to configure and install the RTVAgent Servlet.
If you are using multiple Data Servers that are gathering RTVAgent data, you must configure and install a RTVAgent Servlet for each Data Server.
a. Configure RTVAgent Servlet Options
The RTVAgent Servlet reads the servlet.properties properties file to get configuration information. If you have not installed the RTVAgent Servlet, modify servlet.properties (in the servlets\rtvagent directory) and install (see b. Install the RTVAgent Servlet). If you have already installed the RTVAgent Servlet on your application server, you can edit your properties file in the application server. Note: You may need to restart your application server after making changes to your properties file.
You can set the following options in servlet.properties:
|
Option |
Description |
|
ServiceHost |
The name of the host on which the Data Server is running. Default is localhost. Note: Default localhost assumes the servlet and Data Server are running on the same machine. |
|
ServicePort |
Port for communicating with the Data Server. Default is 5665. |
|
ServiceTimeout |
Amount of time (in seconds) the servlet will wait for replies from the RTVAgent. Default is 15 seconds. |
The following is an example of the servlet.properties file:
ServiceHost=localhost
ServicePort=5665
ServiceTimeout=15
b. Install the RTVAgent Servlet
| • | In an initialized command window, go to the servlets\rtvagent directory and type: |
make_war
This script creates a web archive (.war) named rtvagent.war that includes all of the files necessary to run the RTVAgent Servlet.
| • | Install the files in the rtvagent.war file to your application server according to the documentation for that product. |
F: Set up RTVPost Servlet on Application Server (Optional)
Note: This step is only required if the application(s) posting data to the HTTP Data Source cannot post directly to your RTView Application due to security or post access limitations.
At this point, you should have installed and setup RTView, configured the Data Server, and (optionally) set up the RTVAgent Servlet.
| 1. | Verify System Requirements |
| • | Application server with a JSP servlet container, such as Apache Tomcat. |
| 2. | Install and Setup RTVPost Servlet |
The Data Server uses the RTVPost Servlet that runs on your application server as a proxy servlet for use with the HTTP Data Source, which is useful for cases where an application cannot post directly to the application running the HTTP Data Source due to security or post access limitations. The servlets\rtvpost directory contains all of the files necessary to configure and install the RTVPost Servlet.
If you are using multiple Data Servers that are gathering HTTP data, you must configure and install a RTVPost Servlet for each Data Server.
a. Configure RTVPost Servlet Options
The RTVPost Servlet reads the rtvpost.properties properties file to get configuration information. If you have not installed the RTVPost Servlet, modify rtvpost.properties (in the servlets\rtvpost directory) and install (see b. Install the RTVPost Servlet). If you have already installed the RTVPost Servlet on your application server, you can edit your properties file in the application server. Note: You may need to restart your application server after making changes to your properties file.
You can set the following options in rtvpost.properties:
|
Option |
Description |
|
proxyHost |
The name of the host on which the Data Server is running. Default is localhost. Note: Default localhost assumes the servlet and Data Server are running on the same machine. |
|
proxyPort |
Port for communicating with the Data Server. Default is 3275. |
|
proxyPath |
The path to which to post. This is commented out by default. |
The following is an example of the rtvpost.properties file:
# Properties for the RTView rtvpost servlet.
# proxyHost: the http host to which to post
proxyHost=localhost
# proxyHost: the http port to which to post
proxyPort=3275
# the path to which to post
#proxyPath=
b. Install the RTVPost Servlet
| • | In an initialized command window, go to the servlets\rtvpost directory and type: |
make_war
This script creates a web archive (.war) named rtvpost.war that includes all of the files necessary to run the RTVPost Servlet.
| • | Install the files in the rtvpost.war file to your application server according to the documentation for that product. |
Step 1 is completed. Go to Step 2: Setup File Server.
Step 2: Setup File Server
At this point you have installed, setup, and registered RTView, configured the Data Server, (optionally) set up the RTVAgent Servlet, and (optionally) set up the RTVPost Servlet.
Note: Instead of using a file server, you may install your project files onto each client machine. Using a file server allows you to update project files in a single location but is not required.
| • | All clients must be able to map a drive to this system. |
At this point you have verified your system requirements.
| 1. | Create a shared project directory to store files for the application. |
| 2. | Copy the following files into this directory from the project directory where you developed your RTView application: |
| • | Display (.rtv) files |
| • | COLORS.ini (only required if Custom Colors have been defined). See Custom Colors Tab for more information. |
| • | Panel configuration file (optional). See Multiple Display Panels for more information. |
| • | jar file containing custom classes (optional) |
| • | Security configuration files (optional). See Configuration for more information. |
| 3. | If you already created an OPTIONS.ini in which the Display Viewer is configured to connect to the Data Server via socket, copy the OPTIONS.ini to the project directory created in Step 1. Then go to Step 3: Install and Setup Client. |
If you have not created an OPTIONS.ini, go to next step.
| 4. | On the system where you developed your RTView application, open an initialized command window (see Initializing a Command Prompt or Terminal Window ) and go to the project directory for the application you will be installing and type; |
run_builder -xmlonly -dataserver
Note: The -xmlonly option prevents several data sources from loading. This allows us to save only OPTIONS.ini and not the other data source configuration files, which are not needed for this step.
| 5. | Open the Application Options dialog, select the Data Server Tab and do the following: |
| • | Select Read Data from Socket (Direct or via HTTP) from the Data Server Mode menu and confirm that the Connect Directly to Socket option is selected. |
| • | Set Data Server Host to be the name of the system where you installed the Data Server in Step 1, and the Data Server Port to the port specified in Step 1D-5. |
| • | Configure the Redirect XML Data Source option as best suits your application (Redirect XML Data Source is recommended). The Viewer Only check box should be selected if you do not want these settings to be used by the Display Builder. |
| 6. | Click Save to apply and do the following: |
| • | Save your Data Server options. |
| • | In the confirm dialog, click No to save the OPTIONS.ini file to the current directory. |
| 7. | Copy the OPTIONS.ini file to the directory you created in Step 1. |
You have finished Step 2. Go to Step 3: Install and Setup Client.
Step 3: Install and Setup Client
At this point you have installed, setup and registered RTView, configured the Data Server, (optionally) set up the RTVAgent Servlet, (optionally) set up the RTVPost Servlet, and set up the file server.
See System Requirements Checklist to verify:
| • | Hardware requirements |
| • | RTView application requirements |
Note: You do not need to verify data source requirements.
| • | Must have permission to access the Data Server on the port specified for the socket in the DATASERVER.inifile (see Step 1D) |
Note: Instead of installing RTView on each client system, you can install it only on the file server and have all clients share the installation by running it over a mapped drive. Using a single installation allows you to upgrade your RTView version on a single system. Each client must still register.
| 1. | Install RTView. See Installation for more information. |
| 2. | Setup RTView. See Setup for more information. |
At this point you have installed and setup RTView.
Register for a license for the Display Viewer. See Registration for more information.
You have finished Step 3. Go to Step 4: Start / Run Data Server.
Step 4: Start / Run Data Server
At this point you have installed and setup RTView, configured the Data Server, (optionally) set up the RTVAgent Servlet, (optionally) set up the RTVPost Servlet, and set up the file server and a client. If you are using multiple Data Servers, you will need to repeat the following steps on each system where you will run Data Server(s).
| 1. | In an initialized command window (see Initializing a Command Prompt or Terminal Window ), go to the directory you created in Step 1 and type: |
| 2. | Click Start Serving Data. |
Note: You may also run the Data Server as a daemon process. See Running the Data Server for more information and additional options.
Note: The Data Server is instrumented with JMX to allow you to manage and monitor the clients and application settings. See Managing the Data Server Using JMX for more information.
You have finished Step 4. Go to Step 5: Test Client.
Step 5: Test Client
At this point you have setup RTView, configured the Data Server, (optionally) set up the RTVAgent Servlet, (optionally) set up the RTVPost Servlet, and set up the file server, the client, and are running the Data Server.
| 1. | In an initialized command window (see Initializing a Command Prompt or Terminal Window ), go to the project directory on the file server and: |
type run_viewer
Note: If no file is specified on the command line (on Windows or UNIX), the Display Viewer Application opens init.rtv. If the file init.rtv is not found, a blank display opens. Once the Display Viewer Application is open, you can access display files by selecting File>Open.
Note: Application options set on the command line will override values in initialization files. See Command Line for more information on using command line parameters.
| 2. | Login. By default, the Display Viewer requires a login to support Role-based Security. If your system administrator has configured a user name and password for you, use those. You may also need to select a role. Otherwise, the default user name and password are: |
User Name: admin
Password: admin
Congratulations! RTView deployment is completed.