Attach to CMDB Data
Note: This section applies only if you selected to use the Attach to CMDB Data dialog to attach your cache (Metric Source) data and chose not to auto-load caches.
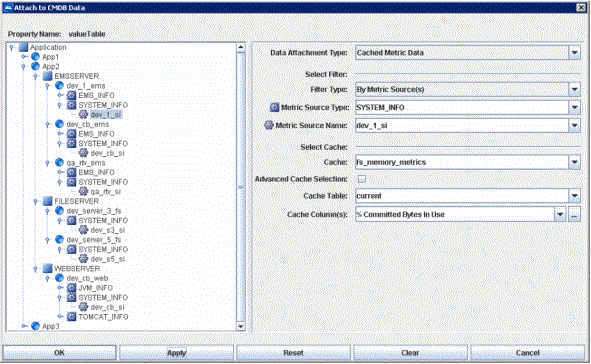
From the Object Properties window you can access the Attach to CMDB Data dialog, which allows you to browse through the Container and Metric Sources defined in the CMDB Configuration Tables and create data attachments either to a list of Metric Source names or to a Cache filtered by a list of Metric Sources. The tree on the left is a graphic representation of the objects and relationships defined in the Container and Metric Source tables. This list is restricted depending on which CMDB objects the logged in user has permission to access.
Note: CMDB caches must be deployed and named Data Servers must be running in order to auto-load those caches and make connections defined in the Metric Source Table. Additionally, the Display Builder must contain definitions for all of those named Data Servers in order for the Attach to Data dialog to list them.
To display the Attach to CMDB Data dialog, right-click on the Property Name from the Object Properties window and select Attach to Data>CMDB. Options in the Attach to CMDB Data dialog vary depending on the selected Data Attachment Type: Cached Metric Data or Metric Source List. For either Data Attachment Type, you must select to filter by Metric Source(s) or by Container(s). The fields in the Select Filter section can be set from the tree (on the left) or from the drop down menus. The advantage of filtering by Container is that when new children are added to the Container, data attachments will update automatically to include those children.
For example (in the screenshot below), for the Containers and Metric Sources shown you can enter App2 for the Container, * for the Child Container Type, and SYSTEM_INFO for the Metric Source Type. This will create a filter containing all of the SYSTEM_INFO Metric Sources under the App2 Container (dev_1_si, dev_cb_si, qa_rtv_si, dev_s3_s1,dev_s1_si). If you specify EMSSERVER for the Child Container Type, the filter will contain all SYSTEM_INFO Metric Source children of all EMSSERVER Container Children of App2 (dev_1_si, dev_cb_si, qa_rtv_si). You can enter * for both the Container and Child Container Type to get all Metric Sources of the specified Metric Source type.
|
Field Name |
Description |
|
|
Data Attachment Type |
Cached Metric Data |
Allows you to make a data attachment to a cache in the CMDB system. Returns a table containing the cache data filtered by the index values of the Metric Sources that match the specified filter parameters. |
|
|
Metric Source List |
Returns a string that is a comma delimited list of Metric Source names matching the filter parameters, which could be used in another CMDB data attachment when passed into the Metric Source Name field. Note: This Data Attachment Type only applies if composite objects have been created for one or more Metric Source Types. See Creating Composites for more information. |
|
Select Filter |
Metric Source(s) |
Metric Source Type - Enter or select a Metric Source Type. If the Data Attachment Type is Metric Source List, you may enter *, otherwise you must specify a single type. Metric Source Name - Enter or select one or more Metric Source names. The list of available names in the drop down menu is filtered by the selected Metric Source Type. Note: It is possible to enter more than one name using a semi-colon delimited list (e.g. dev_1_si;dev_cb_si). |
|
|
Container(s) |
Container Name - Enter or select a Container that is the parent of the Metric Sources you want to filter. Child Container Type - Enter or select a Child Container Type to further restrict the Metric Sources to filter within the selected Container. Metric Source Type - Enter or select a Metric Source Type. If the Data Attachment Type is Metric Source List, you may enter *, otherwise you must specify a single type. |
|
Select Cache |
Cache |
Enter or select the name of the cache you would like to attach. The list of available caches is determined by the selected Metric Source Type. Cache Table - Select the name of the cache table. Cache Column(s) - Select one or more columns. Click on the button to open the Select Columns dialog. The list of available columns is determined by the selected Cache Table. |
|
|
Advanced Cache |
If selected, click on the Select Advanced Cache Data button to open the Attach to Cache Data dialog. Select the name of the cache table and one or more columns. Click on the button to open the Select Columns dialog. The list of available columns is determined by the selected Cache Table. Select the Filter Rows: Advanced option to specify additional time based filtering and/or configure a cache to use an SQL query to retrieve data from an external database. Note: The Cache Name, Filter Column, and Filter Value fields are disabled and auto-populate based on information you entered in the Attach to CMDB Data dialog. |
When an object property is attached to data, the Property Name and Value in the Object Properties window will be displayed in green. This indicates that editing this value from the Object Properties window is no longer possible. Once a property has been attached to data, it receives continuous updates. To remove the data attachment, and resume editing capability in the Object Properties window, right-click on the Property Name and select Detach from Data. You will recognize that an object property has been detached from the data source when the Property Name and Value are no longer green.
Validation Colors
Fields in the dialog change colors according to the information entered. These colors indicate whether or not information is valid.
The following describes the significance of the Attach to CMDB Data validation colors:
|
Red |
Invalid state |
Entry is not valid. |
|
White |
Valid state |
Entry is valid. |
Substitutions
The Substitutions feature allows you to build open-ended displays in which data attachments depend on values defined at the time the display is run. A generic name such is used instead of a specific name. Later when the display is running, this generic value is defined. In this way, a single display can be reused to show data from a number of different sources. For more information on creating displays using substitution values, see Substitutions.
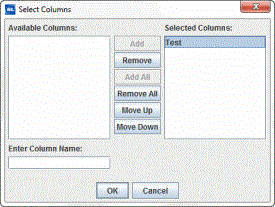
Select Columns
From the Attach to CMDB Data dialog you can specify which cache columns to display and in what order they will appear.
To display the Select Columns dialog, click on the ellipse button in the Cache Column(s) field (or right-click in the Cache Column(s) field and choose Select Columns). The dialog should contain a list of Available Columns that you can add to your table.
To add a column, select an item from the Available Columns list and click on the Add button. If the item you require is not listed, type your selection into the Enter Column Name field. Click the Remove button to delete an item previously added to the Selected Columns list. You can control the order of columns in a table by arranging the items in the Selected Columns list with the Move Up and Move Down buttons.
Validation colors indicate whether selected columns are valid. However, if even one column selected is invalid, the Cache Column(s) field in the Attach to CMDB Data dialog will register as an invalid entry.
Note: Invalid columns will not update.
The following describes the Attach to CMDB Data dialog commands:
|
Command |
Description |
|
OK |
Applies values and closes the dialog. |
|
Apply |
Applies values without closing the dialog. |
|
Reset |
Resets all fields to last values applied. |
|
Clear |
Clears all fields. Detaches object from data source (once Apply or OK is selected). |
|
Cancel |
Closes the dialog with last values applied. |