CMDB Configuration
This section contains the following:
| • | Overview |
| • | Creating CMDB Caches |
| • | Data Server Connections |
| • | CMDB Configuration Tables |
| • | Application Options - CMDB |
| • | Deploying CMDB Caches |
| • | Persisting Cache Data |
| • | Building Displays |
Overview
The CMDB allows you to do the following:
| • | Auto-load caches and make the necessary connections in one or more Data Servers based on the information in the CMDB Configuration Tables. This allows you to have a centralized connection repository. |
| • | Use the Attach to CMDB Data dialog to navigate through and attach to your cache data using the hierarchy defined in the CMDB Configuration Tables. |
| • | Limit access in the Display Builder to the Metric Sources that are allowed for the user's login. |
In order to use the CMDB, you must meet the following prerequisites:
| • | The CMDB tables can be accessed from a SQL database or an XML file. If you want to use a SQL database to store CMDB tables, you will need to have the database installed where it can be accessed by at least one RTView Data Server. |
| • | All of the data you want to access via the CMDB must be stored in indexed caches in one or more Data Servers. |
| • | If you will be using the Attach to CMDB Data dialog in the Display Builder, you must configure the Display Builder to use the RTView login (see Role-based Security). This information will be used in a configuration table that describes valid role names and the top level Containers or Metric Sources to which they have access. |
The CMDB allows you to define two kinds of Configuration Items (CIs):
Metric Source
A Metric Source maps to the data for a single component in your system, this is done by mapping the Metric Source to a filter value in the index column on the associated caches. For example, this might map to an EMS Server, an application server or application component. Metric Source definitions are used both for the Data Server auto-load and for CMDB data attachments.
Container
A Container is used to add hierarchy and grouping to the Metric Sources. A Container can be the parent of one or more Metric Sources and a Metric Source can have more than one parent. For example, if you have an application named MyApp that uses five servers, you could create a Container named MyApp and set it as the parent for those five servers. If the MyApp application is part of an application group named ProductionApps, then you can create a Container named ProductionApps and set it as the parent for MyApp. As you add other applications in the ProductionApps group, you will set that Container as the parent for those applications as well. Note: Containers are not necessary if you select to auto-load caches, they are only used for CMDB data attachments.
The first step in using the CMDB is to create caches to hold your data. These caches will be auto-loaded into a Data Server using the information in the Metric Source and Metric Source Type tables described below in the CMDB Configuration Tables section. Caches must be constructed as described in Creating Caches.
Data Server Connections
Each cache will be auto-loaded into a Data Server along with the required connections. In order for the client application (i.e. Display Builder, Display Viewer, Historian, Display Server) to access cache data, a named Data Server connection is required for each Data Server you will be using. In a later step we will deploy the caches to those named Data Servers, but first you just need to define them. In the Display Builder or Configuration Utility, go to the Data Servers tab and create a named Data Server Connection for each Data Server you will be using. The names you define here will be used in the Metric Source Table described in Configuration Tables.
In this step, you will create the CMDB Configuration Tables that define the caches and connections along with the Metric Sources and their relationships. These tables can either be defined in a SQL database or in an XML file.
Application Options - CMDB
In order for the Data Server to auto-load the caches and for the client applications (i.e. Display Builder, Display Viewer, Historian, Display Server) to service CMDB data attachments, you must configure the location of the Configuration Tables (either in an SQL database or in an XML file) along with the names of the Configuration Tables and a timeout.
Deploying CMDB Caches
In order to deploy the caches to the Data Servers you will need to copy the cache (.rtv) files along with any data source configuration (*OPTIONS.ini) files to the directory (or directories) where you will be running the Data Server(s).
Persisting Cache Data
If your caches have been configured to persist data, you can run one Historian per Data Server. To do so, you must specify a Data Server for which the Historian will automatically load caches and redirect all data attachments. When you run the Historian, use the –histDataServer: command line option:
run_historian –histDataServer:ds1
The Historian will load all of the caches for Metric Sources in the Metric Source Table with the specified Data Server name. This will not make any data source connections, but it will set the specified Data Server as the default Data Server. This will cause all data attachments that are not configured for a named Data Server to be redirected to the specified Data Server.
Note: It is possible to set and save the name of a Historian Data Server from the Application Options dialog on the RTView Server CMDB Settings Tab.
Building Displays
Once you have deployed your caches to the Data Server(s) and the caches have been auto-loaded by the Data Server(s), there are two ways you can build displays:
| 1. | Use the Attach to CMDB Data dialog to attach your Metric Source (cache) data. This will allow you to view the hierarchy and grouping your defined in the Metric Source Table and Container Table. If you use this option, the CMDBOPTIONS.ini file you created in the Application Options section and the CMDB Configuration Tables must be available to the Display Builder and all Data Server clients (i.e. Display Viewer, Historian, Display Server). |
When you use the Attach to CMDB Data dialog for your data attachments, you can optionally create composite objects (see Creating Composites) for one or more Metric Source Types to display data from the caches defined for them.
| 2. | Attach to the auto-loaded caches directly using the Attach to Cache Data dialog. |
Creating CMDB Caches
CMDB caches must be constructed as follows:
| • | All caches for a single Metric Source Type must use only one parameterized data source. At startup, the Data Server will load all of the caches for a Metric Source Type, make connections, and define substitutions for that cache based on the information in the CMDB Configuration Tables. One connection information entry is allowed per Metric Source instance, so each cache for the associated Metric Source Table will use that connection. Caches can use hard-coded connections for other data sources if desired. |
| • | Each cache must specify at least one column in the indexColumnNames property. The Index value listed in the Metric Source Table must exactly match the value in the index column, specified in indexColumnNames, of all associated caches to uniquely identify that Metric Source instance. If more than one index column is required to uniquely identify the Metric Source instance, enter a ; (semi-colon) delimited list of values for the Index value in the Metric Source Table. In this case, the order of the values must exactly match the order of indexColumnNames in the cache. However, note that more index columns may be used in the cache than are included in the Index value of the Metric Source Table. For example, suppose a cache has three index columns, but only the first column is needed to uniquely identify the Metric Source instance. In this case, only one value needs to be entered for the Index value in the Metric Source Table. |
| • | Caches should be constructed so that they don’t reference individual component instances. For example, a cache attached to EMS server data should not use any specific server URLs. Instead, the value * should be used for the server URL and the data should be filtered using the $indexFilter substitution. When the cache is auto-loaded by the Data Server, the $indexFilter substitution will be set to a comma delimited list of index values for all Metric Sources of that type in that Data Server (from the Index column in the Metric Source Table). For data sources that support connection groups, such as JMX or TIBCO Hawk, the $connGroup substitution can be used for the Connection name (or Agent name) if the Index values are JMX Connection names or Hawk Agent names. When the cache is auto-loaded by the Data Server, a connection group is created using the list of index values for all Metric Sources of that type for a single applications, and the $connGroup substitution is set to name of that connection group. Note: If the Manual field in the Metric Source Type table is set to true, the caches are not auto-loaded and therefore the $indexFilter and $connGroup substitutions are not defined. For data sources that do not support the value * or groups for the connection in their data attachments, use the valueTableCount property to set the number of input tables and then make a separate data attachment for each connection. |
| • | All caches must be Table Caches. Double Caches are not supported. |
| • | The same cache (.rtv) file cannot be used for multiple Metric Source Types. |
| • | Each cache name (cacheName property) must be unique across all caches in the CMDB. Note: The cacheName property value cannot contain substitutions. |
| • | The same cache cannot be loaded multiple times each with different sets of substitutions. It will only be instanced once per Metric Source Type per Data Server. Therefore, application level substitutions can be used, but cache specific substitutions cannot. |
| • | If you are going to persist your cache data using the Historian and you are going to load the caches for a single Metric Source Type on multiple Data Servers, you must scope the persisted data. Since the same caches will be loaded by multiple Data Servers, any persisted cache data must also be scoped by a Data Server. When you configure the cache persistence using the historyTableName and currentTableName properties, you must store the cache data from each Data Server in a different database table. When caches are auto-loaded by the Data Servers, the $ds substitution will be set to the name of the Data Server. You can use this substitution in the historyTableName and currentTableName properties to specify a different table name at runtime for caches loaded into different Data Servers (e.g. $ds1.myTableName). This assumes that all tables are in the same database. Alternately, you could use the $ds substitution in the databaseName property to specify different databases for each Data Server. |
CMDB Configuration Tables
To configure the CMDB data source you will need to create the following four tables. These tables describe Metric Sources and their hierarchical relationships, provide associated cache information, and define user accessibility:
| • | Metric Source Table |
| • | Container Table |
| • | Metric Source Type Table |
| • | Permission Table |
| • | Relationship Table |
These tables should be made available either in a SQL database or an XML source file. To add an SQL database connection, select Tools>Options>SQL (see Application Options - SQL for more information) in the Display Builder.
Note: If you select to use an XML source, the file must use the format described under Data Sources>XML>Creating XML Sources (see Creating XML Sources for more information).
In the CMDB Tables Tab of the Applications Options dialog you will provide the information necessary to allow RTView applications to connect to these tables at startup.
Metric Source Table
A Metric Source represents a single item within the system being monitored. A Metric Source maps to a subset of the rows in the cache(s) defined for the corresponding Metric Source Type. The Metric Source Table describes all of the Metric Sources in the system and allows you to create relationships between Metric Sources by specifying one or more parents for each Metric Source. The Metric Source Table must contain the following columns in the following order:
|
COLUMN |
TYPE |
DESCRIPTION |
|
Name |
String |
Unique name to identify the Metric Source. This name must be unique among both the Containers and the Metric Sources. |
|
Type |
String |
Name of one of the Metric Source Types defined in the Metric Source Type Table. |
|
Index |
String |
Value(s) the first index column(s) in the cache(s) must equal to identify this Metric Source. If the cache has a single index column, enter a single value. If the cache requires multiple index columns to uniquely identify this Metric Source, enter a semi-colon delimited list of values here. Note: The values must be entered in the same order as the index columns in the cache(s). |
|
Connection Information |
String |
Description of connection to make for this Metric Source in the cache file(s). The content will depend on the data source used in the cache files for this Metric Source. See CMDB - Metric Source Table - Connection Information for connection string syntax for each data source. |
|
Data Server |
String |
Name of the Data Server that will host the cache file(s) for this Metric Source. See Data Server Tab for more information. Note: All clients of the Data Server (i.e. Display Builder, Display Viewer, Historian, and Display Server) must be configured separately with a named Data Server. |
|
Active |
Boolean |
If set to 0 (FALSE), do not load this Metric Source and ignore any references to it. |
Sample Metric Source Table:
|
NAME |
TYPE |
INDEX |
CONNECTION_INFO |
DATA_SERVER |
ACTIVE |
|
dev_1_ei |
EMS_INFO |
tcp://SLXP1:7222 |
jmsadm_server name=EMS-SERVER-SLXP1 url=tcp://SLXP1:7222 |
ds2 |
TRUE |
|
dev_1_si |
SYSTEM_INFO |
agentxp1;_Total |
|
ds1 |
TRUE |
|
dev_3_ei |
EMS_INFO |
tcp://SLXP3:7222 |
jmsadm_server name=EMS-SERVER-SLXP3 url=tcp://SLXP3:7222 |
ds2 |
TRUE |
|
dev_3_si |
SYSTEM_INFO |
SLXP3;_Total |
|
ds2 |
TRUE |
|
dev_cb_ei |
EMS_INFO |
tcp://slpro31:7222 |
jmsadm_server name=EMS-SERVER-slpro31 url=tcp://slpro31:7222 |
ds1 |
TRUE |
|
dev_cb_ji |
JVM_INFO |
conn_cb |
jmxconn conn_cb slpro31 9999 URL:- - - false |
ds2 |
TRUE |
|
dev_cb_si |
SYSTEM_INFO |
slpro31;_Total |
|
ds1 |
TRUE |
|
dev_cb_ti |
TOMCAT_INFO |
conn_cb |
jmxconn conn_cb slpro31 9999 URL:- - - false |
ds1 |
TRUE |
|
dev_s3_ei |
EMS_INFO |
tcp://slserver3:7222 |
jmsadm_server name=EMS-SERVER-slserver3 url=tcp://slserver3:7222 |
ds2 |
TRUE |
|
dev_s3_ji |
JVM_INFO |
conn_s3 |
jmxconn conn_s3 slserver3 9999 URL:- - - 'false' |
ds1 |
TRUE |
|
dev_s3_si |
SYSTEM_INFO |
agentserver3(testConn);_Total |
hawkconsole testConn rvd QADomain 7474 ; tcp:7474 |
ds2 |
TRUE |
|
dev_s3_ti |
TOMCAT_INFO |
conn_s3 |
|
ds1 |
TRUE |
|
dev_s5_si |
SYSTEM_INFO |
slserver5;_Total |
|
ds1 |
TRUE |
|
doc_1_si |
SYSTEM_INFO |
agent30p;_Total |
|
ds1 |
TRUE |
|
qa_rtv_ei |
EMS_INFO |
tcp://slqa9:7222 |
jmsadm_server name=EMS-SERVER-slqa9 url=tcp://slqa9:7222 |
ds1 |
TRUE |
|
qa_rtv_si |
SYSTEM_INFO |
slqa9;_Total |
|
ds1 |
TRUE |
CMDB - Metric Source Table - Connection Information
The value of the Connection Information field in the Metric Source table varies according to which RTView data source is used for the associated cache files. To find out the data source being used for a Metric Source look at the value of the Type field in the Metric Source Table, then go find that value in the Type column of the Metric Source Type table. The value in the Dskey field for that row indicates which data source the cache files will be using.
In some cases, the connection will be only be used by a single item in the Metric Source table. An example of this would be a Metric Source that uses the EMS Administration data source and uses the EMS Server URL for the Index value. In this case, each Metric Source contains information on how to connect to that EMS Server. In other cases, a single connection might be used for multiple items in the Metric Source table. An example of this would be a group of Metric Sources that use the SQL data source and use a value from the database table as the Index value. In this case, the connection need only be defined for one of the Metric Source instances as long as all of the Metric Sources are running on the same Data Server. However, if Metric Sources of this type are being deployed to multiple Data Servers, at least one Metric Source instance for each Data Server must contain the connection information.
Select from the data sources listed below to reference the connection string syntax. If you do not want to create the connection string by hand, you can define the connection in the Application Options dialog for that data source (either in the Display Builder or Configuration Utility), then save the configuration file. Open the configuration file in a text editor and copy the connection string from the configuration file into the Connection field in your database.
Note: Data sources that use a different connection token than those listed in the configuration files have been noted below.
|
DATA SOURCE DSKEY |
DATA SOURCE DSKEY |
|
IBMMQ |
ibmmq (See IBMMQ (ds key = ibmmq)) |
|
RTVPipe |
pipe (See RTVPipe (ds key = pipe)) |
|
JMS |
jms (See JMS (ds key = jms)) |
|
SNMP |
snmp (See SNMP (ds key = snmp)) |
|
JMX |
jmx (See JMX (ds key = jmx)) |
|
SQL |
sql (See SQL (ds key = sql)) |
|
TIBCO EMS Administration |
jmsadm (See TIBCO EMS Administration (ds key = jmsadm)) |
|
RTVAgent |
rtvagent (See RTVAgent (ds key = rtvagent)) |
|
TIBCO Hawk |
hawk (See TIBCO Hawk (ds key = hawk)) |
IBMMQ (ds key = ibmmq)
An example connection string:
immed_conn __name=vmrh5-1 host=192.168.200.164 port=1414 channel=SYSTEM.DEF.SVRCONN modelQueueName=SYSTEM.DEFAULT.MODEL.QUEUE waitInterval=10 maxRetries=5 retryInterval=30
The string must start with the connection token immed_conn. Note that this token is different than the connection token used in the IBMMQOPTIONS.ini file which uses ibmmqconn instead.
The immed_conn token is followed by a sequence of name=value pairs, where name is the name of the field, and value is the value.
The fields are defined as follows:
|
Field Name |
Description |
|
__name |
The name of the connection – used to uniquely identify the connection Example: vmrh5-1 |
|
host |
The name or IP address of the computer to connect to. (The host the queue manager of interest is running on ) Example: 192.168.200.164 |
|
port |
The port number of the connection. This is the listener port address for queue manager. The default port used is 1414 Example: 1414 |
|
channel |
Client Channel to use for this connection (use SYSTEM.DEF.SVRCONN) Example: SYSTEM.DEF.SVRCONN |
|
modelQueueName |
The named model queue of the connection Example: SYSTEM.DEFAULT.MODEL.QUEUE |
|
waitInterval |
The wait interval of the connection (in seconds). This is the amount of time the connection will wait for a response before timing out ( it may be necessary to have a larger values on “slow” machines or where a large amount of data is returned Example: 30 |
|
maxRetries |
The Maximum number of subsequent connection retry attempts, when a connection attempt fails. Set maxRetries to 0 if you only want one attempt at connection (i.e. 0 retries) Example: 5 |
|
retryInterval |
Minimum interval between connection retry attempts (in seconds). The minimum elapsed time between connection attempts, when a connection attempt fails. Example: 30 |
JMS (ds key = jms)
An example connection string:
jmsconn sampleconn com.tibco.tibjms.TibjmsTopicConnectionFactory tcp://myserver:7222 user1 pass1 -
The string must start with the jmsconn connection token.
The jmsconn token is followed by the following values in the following order. To leave a value blank, use a dash. Enclose any values that contain spaces in single quotes.
|
Field Name |
Description |
|
Connection Name |
Name to use when referencing this JMS connection in your data attachments. Example: sampleconn |
|
Factory Class Name |
The fully qualified name of the topic connection factory class to use when creating this connection. The path to this class must be included in the RTV_USERPATH environment variable. Example: com.tibco.tibjms.TibjmsTopicConnectionFactory |
|
Server URL |
The complete URL for your JMS message server. Example: tcp://myserver:7222 |
|
User Name |
User name to use when creating this connection Example: user1 |
|
Password |
Password to use when creating this connection. This can be entered as plain text or as encrypted text from the encode_string option. Example: pass1 |
|
Client ID |
The client identifier to set on this connection. Example: slclient |
|
Host Name |
For IBM WebSphere MQ only. The name of the host to use for this connection. Example: myHost |
|
Port |
For IBM WebSphere MQ only. The name of the port to use for this connection. Example: 9999 |
|
Queue Manager |
For IBM WebSphere MQ only. The name of the queue manager to use for this connection. Example: myQueueManager |
JMX (ds key = jmx)
An example connection string:
jmxconn MyConnection localhost 9998 user1 pass1
The string must start with the jmxconn connection token.
The jmxconn token is followed by the following values in the following order. To leave a value blank, use a dash except where noted below. Enclose any values that contain spaces in single quotes.
|
Field Name |
Description |
|
Connection Name |
Name to use when referencing this JMX connection in your data attachments. Example: MyConnection |
|
Host or IP |
Host name or IP address of the MBean server. Example: localhost |
|
Port |
Port that your JMX instrumented application is using to expose MBean methods. Example: 9998 |
|
URL |
URL that should be used to create this connection. Enter local to make a local connection to an in-process MBean server. If this field is blank, don’t enter a dash for it, just don’t enter a value for it. Example: local |
|
User Name |
User name to use when creating this connection Example: user1 |
|
Password |
Password to use when creating this connection. This can be entered as plain text or as encrypted text from the encode_string option. See Encrypt text using the encode_string option for more information. Example: pass1 |
|
Use Client Credentials |
If true, the User Name and Password from the RTView login will be used instead of the User Name and Password entered in this connection string. Example: false |
|
Additional Properties |
Add any properties necessary to initiate connections with specific MBean servers. These should be name value pair separated by spaces. If no properties are needed, leave this field blank, do not add a dash. Example: myPropertyName myPropertyValue |
RTVPipe (ds key = pipe)
This data source does not use connections. It works by executing the command specified in the data attachment and parsing the return. It does not support connections.
RTVAgent (ds key = rtvagent)
This data source does not use connections. It works by configuring the remote Agent applications to send data to a Data Server, not by configuring the Data Server to query the remote Agents.
SNMP (ds key = snmp)
An example connection string:
immed_conn __name=local host=127.0.0.1 dataport=161 trapport=162 version=v2c community=public
The string must start with the immed_conn connection token. Note that this token is different than the connection token used in the SNMPOPTIONS.ini file, which uses snmpconn instead.
The immed_conn token is followed by a sequence of name=value pairs, where name is the name of the field, and value is the value.
The fields are defined as follows:
|
Field Name |
Description |
|
__name |
The name of the connection – used to uniquely identify the connection. Example: vmrh5-7 |
|
host |
The name or IP address of the computer to connect to. Example: 192.168.200.174 |
|
dataport |
The connection will poll for data on this port. Example: 161 |
|
trapport |
The connection will listen for trap messages on this port. Example: 161 |
|
version |
The version of SNMP. This can be v1 or v2c. Example: v1 |
|
community |
The SNMPv2 Community Name string. This is only used if the version is v2c. Example: public |
SQL (ds key = sql)
An example connection string:
sqldb APPDATA user1 pass1 jdbc:hsqldb:hsql://localhost:3380/appdata org.hsqldb.jdbcDriver - false true
The string must start with the sqldb connection token. The sqldb token is followed by the following values in the following order. To leave a value blank, use a dash. Enclose any values that contain spaces in single quotes.
|
Field Name |
Description |
|
Database Name |
The name to use when referencing this database connection in your data attachments Example: APPDATA |
|
User Name |
The user name to use when connecting to this database. Example: user1 |
|
Password |
The password to use when connecting to this database. The may be entered in plain text or encrypted text from the encode_string option. See Encrypt text using the encode_string option for more information. Example: pass1 |
|
URL |
The url to use when connecting to this database. Example: jdbc:hsqldb:hsql://localhost:3380/appdata |
|
Driver |
The fully qualified name of the JDBC driver class to use when connecting to this database. The path to this driver must be included in the RTV_USERPATH environment variable. Example: org.hsqldb.jdbcDriver |
|
Table Types |
Comma delimited list of tables types to retrieve when querying the database for available tables. Refer to your database manual for a list of valid table types. Example: TABLE,VIEW |
|
Use Client Credentials |
If true, the User Name and Password from the RTView login will be used instead of the User Name and Password entered in this connection string. Example: true |
|
Run Queries |
Concurrently If true, each query on the connection is run on its own execution thread. Example: false |
TIBCO EMS Administration (ds key = jmsadm)
An example connection string:
jmsadm_server=name='my server' url=tcp://myhost:7222 agent=myagent user=myusername pass=mypassword
The string must start with the jmsadm_server connection token.
The token jmsadm_server token is followed by a sequence of name=value pairs, where name is the name of the field, and value is the value. Any values that contain spaces should be enclosed in single quotes.
The fields are defined as follows:
|
Field Name |
Description |
|
name |
The name of the EMS Server. Example: EMS-SERVER-myserver2 |
|
url |
The complete URL for your EMS Server Example: tcp://myserver2:7222 |
|
agent |
Name of the agent containing the microagent method to subscribe. Example: myagent |
|
user |
The user name to user name to use when connecting to this EMS Server Example: user1 |
|
pass |
The password to use when connecting to this EMS Server. This may be entered in plain text or encrypted text generated from the encode_string option. See Encrypt text using the encode_string option for more information. Example: password1 |
TIBCO Hawk (ds key = hawk)
The string must start with the connection token hawkconsole.
The token hawkconsole token is followed by a name identifying this hawk console.
The name token is followed by the transport type. Valid values are rvd, rva, and ems.
If the transport type is rvd, it is followed by 4 values separated by spaces: domainName service network daemon. For example:
hawkconsole testConn rvd TestDomain 7474 ; tcp:7474
If the transport type is rva, it is followed by 2 values separated by spaces: host port. For example:
hawkconsole testConn2 rva MyHost 5555
If the transport type is ems, it is followed by 3 values separated by spaces: serverUrl username password. For example
hawkconsole testConn3 ems tcp://myserver:7222 user1 pass1
If any values in the above strings contain spaces, enclose them in single quotes. If any values are blank, use a -. For the ems transport type, the password may be entered in plain text or encrypted text from the encode_string option. See Encrypt text using the encode_string option for more information.
Encrypt text using the encode_string option
If you need to provide an encrypted password (rather than expose server password names in a clear text file, use the encode_string command line option with the following syntax:
encode_string type mypassword
where type is the key for the data source and mypassword is your plain text password.
Note: The type argument is only required when you encrypt a string for a data source.
For example, for the SQL data source you would enter the following in an initialized command window (see Initializing a Command Prompt or Terminal Window for more information):
encode_string sql mypassword
and you will receive an encrypted password:
encrypted value: 013430135501346013310134901353013450134801334
Copy the encrypted value, paste it into the password field and click Save to save this value to the initialization (*.ini) file. Or, if necessary, manually edit the (*.ini) file to include the encrypted value.
Note: If you need to manually edit a configuration (*.ini) file, contact SL Technical Support at support@sl.com for information about supported syntax.
Container Table
Containers allow you to create a hierarchy of Metric Sources. A Container does not map to cache data like the Metric Sources, it just allows you to group and create hierarchies of Metric Sources. A Container can be specified as a parent to any number of Metric Sources or Containers. Circular references are not allowed.
Note: This table can be left empty if you selected to auto-load caches and will not use the Attach to CMDB Data dialog to attach to your cache (Metric Source) data.
The Container Table defines all Containers in the system and describes their relationships; it must contain the following columns in the following order:
|
COLUMN |
TYPE |
DESCRIPTION |
|
Name |
String |
Unique name to identify the Container. This name must be unique among both the Containers and the Metric Sources. |
|
Type |
String |
A label to describe the type of Container. This value will allow you to group Containers of the same type at the same level of the hierarchy. Note: Metric Source Types cannot be used in this field. |
Sample Container Table:
|
NAME |
TYPE |
|
App1 |
Application |
|
App2 |
Application |
|
dev_3_ems |
EMSSERVER |
|
dev_server_3_web |
WEBSERVER |
|
production_group1 |
PRODUCTION |
|
production_group2 |
PRODUCTION |
|
qa_group1 |
QA |
|
dev_1_ems |
EMSSERVER |
|
dev_cb_web |
WEBSERVER |
|
dev_server_3_fs |
FILESERVER |
|
dev_server_5_fs |
FILESERVER |
|
qa_rtv_ems |
EMSSERVER |
|
dev_1_fs |
FILESERVER |
|
dev_cb_ems |
EMSSERVER |
|
dev_server_3_ems |
EMSSERVER |
|
doc_1_fs |
FILESERVER |
|
dev_cb_fs |
FILESERVER |
Metric Source Type Table
A Metric Source Type maps your Metric Sources to their corresponding caches. It allows you to define one or more caches that contain the data for all Metric Sources of that type. The Metric Source Type Table describes all of the Metric Source Types and their associated cache file information; it must contain the following columns in the following order:
|
COLUMN |
TYPE |
DESCRIPTION |
|
Type |
String |
Unique value to identify a Metric Source type. The values in this column must be used as the values for the Metric Source Type in the Metric Source Table. |
|
CacheFileNames |
String |
Comma delimited list of one or more cache (.rtv) file names. Note: The same cache file cannot be used for multiple Metric Source Types. |
|
DsKey |
String |
Data source key used in your cache files. Connection information from the Metric Source Table will be send to this data source. See CMDB - Metric Source Table - Connection Information for connection string syntax for each data source. |
|
Manual |
Boolean |
If set to 1 (TRUE), caches of this type and connections for this Metric Source Type will not be auto-loaded into the Data Server or Historian. |
Sample Metric Source Type Table:
|
TYPE |
CACHE_FILE_NAMES |
DSKEY |
MANUAL |
|
EMS_INFO |
ems_cache.rtv,ems_queue_cache.rtv |
jmsadm |
FALSE |
|
JVM_INFO |
jvm_cache.rtv |
jmx |
FALSE |
|
SYSTEM_INFO |
fs_cache.rtv |
hawk |
FALSE |
|
TOMCAT_INFO |
tomcat_cache.rtv |
jmx |
FALSE |
Permission Table
The Permission Table describes all valid Roles and the top level Containers or Metric Sources to which they have access. This information is used by the Display Builder to limit access to available Metric Sources. When a user runs the Display Builder, they must login using one of the Roles defined in this table in order to access CMDB data.
Note: This table can be left empty if you selected to auto-load caches and will not use the Attach to CMDB Data dialog to attach to your cache (Metric Source) data.
The Permission Table must contain the following columns in the following order:
|
COLUMN |
TYPE |
DESCRIPTION |
|
Role |
String |
Specify a role value from the RTView login. This value must match exactly. If the role allows access to multiple applications, each should be listed in a separate row. |
|
CI_Name |
String |
Name of a CI listed in the Container Table or Metric Source Table. This CI will be added as a top level CI in the Attach to CMDB Data dialog for this user, and all data for that CI and all of its children will be available. Enter a value of * to add all CIs from the Container and Metric Source tables that have no Parents as top level CIs. |
Sample Permission Table:
|
ROLE |
CI_NAME |
|
admin |
* |
|
app1user |
App1 |
|
app2user |
App2 |
|
poweruser |
App1 |
|
poweruser |
App2 |
Relationship Table
The Relationship Table contains all relationship information for Containers and Metric Sources.
The Relationship Table must contain the following columns, with the specified names and types, in the following order:
|
COLUMN |
TYPE |
DESCRIPTION |
|
ID1 |
String |
Name of the parent container. |
|
ID2 |
String |
Name of the child container or metric source. |
|
TYPE |
String |
Relationship type. Currently, only PC (parent-child) is supported. |
Sample Relationship Table:
|
ID1 |
ID2 |
TYPE |
|
production_group1 |
App1 |
PC |
|
production_group1 |
App2 |
PC |
|
App1 |
dev_3_ems |
PC |
|
App1 |
dev_1_fs |
PC |
|
App2 |
dev_3_ems |
PC |
|
App2 |
dev_cb_web |
PC |
Application Options - CMDB
Select Tools>Options in the Display Builder to access the Application Options dialog.
Options specified in CMDB tabs are saved in an initialization (.ini) file. This file, CMDBOPTIONS.ini, along with general options saved in OPTIONS.ini, must be copied to all Display Builder, Display Viewer, Historian, Data Server, and Display Server deployments. Any related data source specific options (.ini) files must be copied to all of the Data Server and Power User Display Builder deployments.
On startup, these initialization files are read by the Display Builder, Display Viewer, Display Server, Data Server, and Historian to set initial values. If no directory has been specified for your initialization files and CMDBOPTIONS.ini is not found in the directory where you started the application, then RTView will search under lib in your installation directory. See RTV_JAVAOPTS for more information.
Note: Options specified using command line arguments (see Command Line Options - CMDB for more information) will override values set in initialization files.
There are two Application Options tabs for CMDB:
| • | CMDB Tables Tab |
| • | RTView Server CMDB Settings Tab |
CMDB Tables Tab
In the CMDB Tables tab of the Applications Options dialog, you will provide the information necessary to allow RTView to connect to the required CMDB configuration tables (see CMDB Configuration Tables for more information), which can be made available via a SQL database or an XML source file. To add a SQL database connection, select Tools>Options>SQL Tab in the Display Builder.
Note: If you select to use an XML source, that file must use the format described under Data Sources>XML>Creating XML Sources (see Creating XML Sources for more information).
Click Save to save these options to the CMDBOPTIONS.ini file which will be read at startup.
Note: These options, along with any named Data Server definitions and the SQL Database or XML Source definition, must be made available to all Display Builder, Display Viewer, Data Server, Historian, and Display Server instances that want to use this CMDB data.
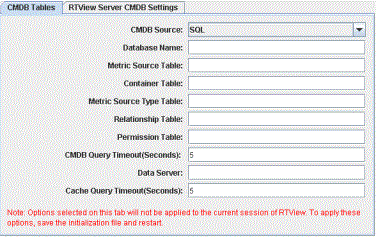
|
Field Name |
Description |
|
CMDB Source |
XML or SQL |
|
Database Name / XML Source Name |
Name of a SQL database connection or an XML source that is already defined. See Creating XML Sources for more information. |
|
Metric Source Table |
Name of the Metric Source Table in the database or XML file. |
|
Container Table |
Name of the Container Table in the database or XML file. |
|
Metric Source Type Table |
Name of the Metric Source Type Table in the database or XML file. |
|
Relationship Table |
Name of the Relationship Table in the database or XML file. |
|
Permission Table |
Name of the Permission Table in the database or XML file. |
|
CMDB Query Time Out (Seconds) |
Enter the time (in seconds) to wait for the data attachment for each CMDB table to return. Default is 5 seconds. Note: The data attachment may return faster than the specified time out. Data attachments to all CMDB tables are made once at startup in the main thread, so this timeout will impact startup time if the CMDB data is not available. |
|
Data Server |
Optionally specify the name of a defined Data Server to route data attachments for the CMDB tables to that Data Server. Select the Data Server Tab in the Application Options dialog to configure your Data Server(s). If left blank and a default Data Server is specified on the Data Server tab, the CMDB table data attachments will be routed to that Data Server. If left blank and no default Data Server is specified on the Data Server tab, the data source will connect directly to the CMDB tables which will result in the Display Builder, Display Viewer, Display Server and Data Servers all making separate connections to the CMDB tables. |
|
Cache Query Time Out (Seconds) |
Enter the time (in seconds) to wait for the data attachment for each cache table to return. Default is 5 seconds. Note: The data attachment may return faster than the specified time out. Data attachments to cache tables are made at startup in the main thread for all applications except the Data Servers, so this timeout may impact startup time if the cache data is not available. |
RTView Server CMDB Settings Tab
This CMDB tab of the Applications Options dialog allows you to limit the number of CMDB objects loaded by the Display Server and to specify a Data Server for which the Historian will automatically load caches and redirect all data attachments.
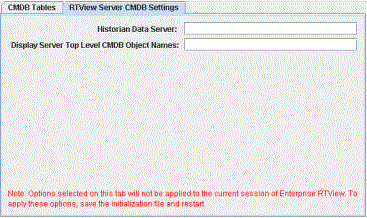
|
Field Name |
Description |
|
Historian Data Server |
Enter the name of a Data Server. The Historian will load all of the caches for Metric Sources in the Metric Source table with that Data Server. This will not make any data source connections, but it will set the specified Historian Data Server as the default Data Server. This will cause all data attachments that are not configured for a named Data Server to be redirected to the Historian Data Server. Note: To utilize this option your caches must have been configured for persistence. |
|
Display Server Top Level CMDB Object Names |
Specify the name(s) of one or more top level CMDB objects. By default, the Display Server will load in all Containers and Metric Sources without parents along with all of their children. |
Deploying CMDB Caches
In order for the Data Server to auto-load the caches, the cache files and their corresponding data source configuration files must be copied to the Data Servers you specified for the corresponding Metric Sources. Each Data Server must also have access to the CMDBOPTIONS.ini file you created in the Application Options section above and it must have access to the SQL database or XML file containing your CMDB Configuration Tables either directly or via Data Server.
To deploy the caches to the Data Servers, you must copy the cache (.rtv) files along with any data source configuration (*OPTIONS.ini) files* to the directory (or directories) where you will be running the Data Server(s).
Note: The system(s) where you run the Data Server(s) must meet the System Requirements and Setup for the data sources used in the cache files for that Data Server.
Run each Data Server using the –processName: command line option to specify a process. This processName must match the name in the Data Server column of the Metric Source Table.
run_dataserver –processName:ds1
The Data Server will query the Metric Source Table for all rows where the Data Server column value equals the processName and load caches and create connections for all of those Metric Sources.
*It is important to note that while connection information for Metric Sources is contained in the Metric Source Table, other data source specific options (contained in data source specific configuration *OPTIONS.ini files) are not. Therefore, directory (or directories) where you run the Data Server must also contain configuration (.ini) files with required options for data source(s) that are being used for a Metric Source. For example, in order for TIBCO Hawk caches to work correctly, the Disable Data Caching and Include Index Columns options should be enabled. For TIBCO EMS Administration, you might want to turn off auto-discover options since all of the EMS-Server connection information is contained in the Metric Source Table. In these cases, the files HAWKOPTIONS.ini and JMSADMOPTIONS.ini must be included to successfully run caches for those data sources.
Steps for Deploying Caches
This process takes you through running the cache files locally, then on the Data Server without the CMDB to confirm that the caches are properly constructed.
| 1. | Construct your cache file as detailed in the Creating CMDB Caches section. |
| 2. | Confirm that the cache file running locally in the Display Builder works as expected and contains all of the data you expect to see. This will require that all of your data source specific configuration (.ini) files are setup correctly. |
| 3. | Deploy your cache file to the named Data Server that will be hosting it. Move your data source specific configuration (*OPTIONS.ini) files and CACHEOPTIONS.ini to the Data Server along with the cache files. Run the Data Server without using the –processName: command line option. |
| 4. | From the Display Builder, make data attachments to the cache using the Named Data Server connection in your data attachment. Confirm that these data attachments return the expected behavior. |
| 5. | Now that you’ve confirmed that the cache file is properly constructed and that the data source options are all correct, add it to the Configuration Tables in your CMDB Configuration Database. When adding the connection information to your Metric Source definitions, copy the corresponding line from your data source options (.ini) file for that connection and paste it into the database. This will avoid problems with typos. |
There are two cases where you will need to slightly modify the connection string before adding it to the database:
| • | For the IBMMQ data source: change ibmmqconn to immed_conn. |
| • | For the SNMP data source: change snmpconn to immed_conn. |
| 6. | Remove the connections you copied into the database from the data source specific configuration (.ini) files. |
| 7. | Remove the CACHEOPTIONS.ini file. |
| 8. | Restart the Data Server where you are hosting the cache with the appropriate –processName: command line option. |
| 9. | Restart the Display Builder and confirm that CMDB data attachments to that cache work as expected. |
| 10. | If CMDB data attachments do not show any data, confirm that cache data attachments using the named Data Server connection work. |
| • | If cache data attachments also do not work, check that the connection strings in your database are correct and that the named Data Server connection did not fail (check the console for connection errors). |
| • | If the cache data attachments do work, this probably indicates a problem with the cache index column values. The index is required by the CMDB, but only optional for direct cache data attachments. Confirm that your cache contains at least one indexColumnName. Also confirm that the value in the Index column of the Metric Source configuration table is the correct value for that Metric Source. It must be the value in the index column of the cache file(s) in the row that represents that Metric Source. |
Creating Composites
According to the following three rules, optionally create composite objects for one or more Metric Source Types to display data from the caches defined for them.
All Composites must expose one scalar variable that the user can attach to a single Metric Source name or a list of Metric Source names.
For example, in the Display Builder select Tools>Variables to open the Variables dialog. Enter a variable name (e.g. msciList), then click Add. This variable must not be mapped to a sub and it must be public in order for it to show up in the list of properties on the composite object.
The Composite must contain a function that sets the value of the above variable into a substitution.
For example, in the Display Builder select Tools>Functions to open the Functions dialog. Click Add and enter the following:
| • | Function Name = setMsciList |
| • | Function Type = Set Substitution |
| • | Substitution String = $MsciList |
| • | Substitution Value = Right-click and select Attach to Data>Variable and select msciList |
All data attachments to CMDB caches must be configured using the Attach to CMDB Data dialog. The Filter Type must be By Metric Source(s) and the Metric Source name should be the substitution set by the function (e.g. $MsciList).
Note: Data attachments to CMDB caches should not be made using the Attach to Cache Data dialog, as this will prevent the composite from reflecting changes in the CMDB configuration.