To output monitoring data to PubSub+ Monitor, you Start and Login to the Solution Package for Solace and Configure Data Collection.
Proceed to Start and Login to the Solution Package for Solace.
Navigate to the SolacePubSubMonitor/bin directory and execute the start_servers.sh script (or start_servers.bat for Windows).
Open a browser and go to:
http://IPAddress:8068/rtview-solmon if you are executing your browser on a different host than where the monitor is running.
http://localhost:8068/rtview-solmon if you are executing your browser in the same host where the monitor is running.
Use rtvadmin/rtvadmin for username/password.
The Solution Package for Solace opens. The displays populate with data after you add connection properties for your Solace Message Brokers (which is subsequently described in these instructions).
Proceed to Open the RTView Configuration Application.
Open a browser and go to:
http://IPAddress:8068/rtview-solmon-rtvadmin if you are executing your browser on a different host than where the monitor is running.
http://localhost:8068/rtview-solmon-rtvadmin if you are executing your browser in the same host where the monitor is running.
Use rtvadmin/rtvadmin for username/password.
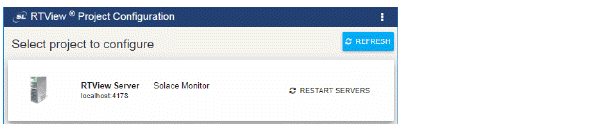
The RTView Configuration Application HOME page opens.
Select the Solace Monitor project.
The main configuration page for the RTView Server - Solace Monitor project opens.
The navigation tree is in the left panel and the General and Custom Properties tabs are shown in the upper part of the main page. The name of the selected tab is highlighted and the other tabs are grayed out. You click on either of the grayed tabs to change the selected tab.
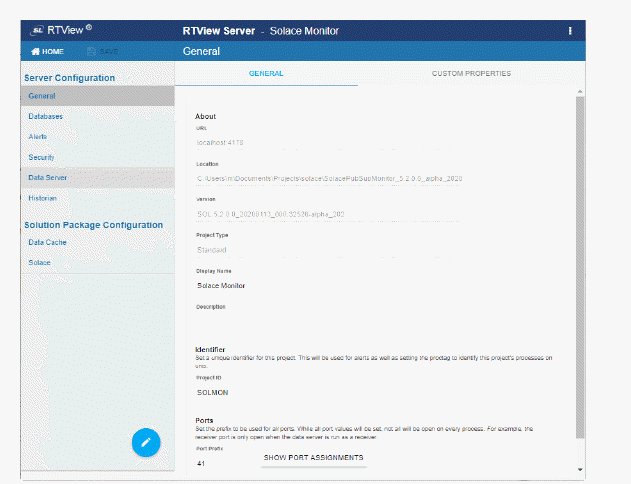
These instructions use the following format to describe navigation to each tab: Navigation tree>Tab. For example, the figure above illustrates the General>GENERAL Tab.
Proceed to Configure Data Collection (a required configuration).
This section describes how to define the connection for the brokers you wish to monitor and verify that data is collected from them. This configuration must be performed before running any deployment of the Monitor. This configuration is the only required configuration.
If you don’t have special requirements for running the monitor (such as running multiple data collectors in the same host), there is no need to cover the optional subsections. Consult Technical Support before modifying other configurations to avoid the circumstance of future upgrade issues.
Note that for Solace Cloud Event Brokers you will need the exact SEMP version on each of your Solace Cloud Brokers. See Obtain SEMP Version.
Open the RTView Configuration Application, select Solace (in navigation tree)>CONNECTIONS tab and click  .
.
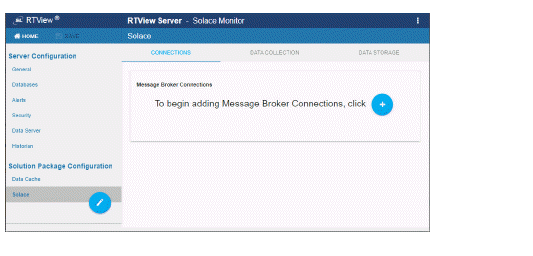
The Add Connection dialog opens.
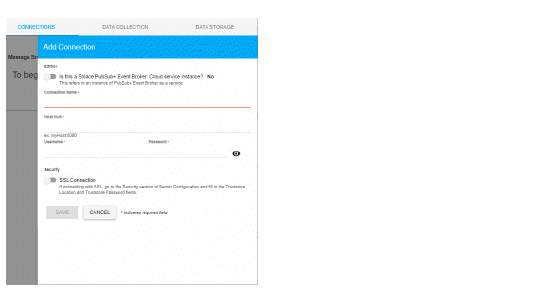
In the Add Connection dialog do the following:
Toggle ON Edition if your broker is a PubSub+ Event Broker:Cloud service instance.
For Cloud Service Brokers, enter the Connection Name, URL, Username, Password, SEMP Version* and VPN Name. Turn on the SSL Connection toggle if your broker is SSL Secured. See Obtain SEMP Version for instructions about getting the SEMP version installed in your message brokers.
For Non-Cloud Service Brokers, enter the Connection Name, Host:Port, Username and Password.
If you are connecting via SSL, toggle ON SSL Secured, select SECURITY (in the navigation tree) and fill in the SSL Credentials section with the appropriate Truststore Location and Truststore Password values for your Brokers.
Repeat these steps to add more brokers and when finished, click  to close the dialog and
  (in title bar) to save your settings.
The connections you created are listed in the Connections tab. For HA pairs, the connection string for the backup broker has "-B" concatenated to it.
Click  to apply changes. The data server will be available again in 10-15 seconds.
Open a browser and go to the Solution Package for Solace:
http://IPAddress:8068/rtview-solmon if you are executing your browser on a different host than where the monitor is running.
http://localhost:8068/rtview-solmon if you are executing your browser in the same host where the monitor is running.
Use rtvadmin/rtvadmin for username/password.

You should now see monitoring data. If you encounter issues, check the log files in the SolacePubSubMonitor/projects/rtview-server/log directory for errors.
If you are going to:
Output Data to InfluxDB, proceed to Create Database and User Account.
Output Data to PubSub+ Monitor, congrats! You have finished the required setup. You can take advantage of the many optional Solution Package for Solace features. See Optional Setup for details.
This section only applies to Solace Cloud Event Brokers. You need to provide the exact SEMP version on each of your Solace Cloud Brokers.
Use the Solace Cloud console to get the value for the Solace Broker Version field, under Stats. The broker version aligns with the SEMP v1 version. You will use the first three digits, including any decimal points, of the value shown in the Solace Cloud Event Broker Solace Broker Version field, concatenated with this string: VMR.
For example, if the value for the Solace Broker Version field is 9.1.1.1.0, you enter: 9.1.1VMR