The Cluster Overview is the main display of the Monitor. This display enables you to quickly assess the configuration, activity and health of all of your Coherence clusters.
NOTE: It takes about 60 seconds after the Monitor Data Server is started for data to initially appear in displays. By default, data is collected and displays are refreshed every 30 seconds.
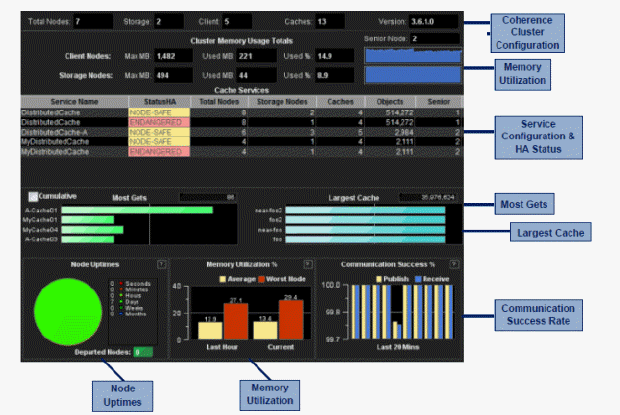
The main is organized by the following areas:
Coherence Cluster Configuration: Get the cluster name and total counts of members (JVMs) in each cluster. Counts include storage nodes, client nodes (non-storage nodes), the total number of caches and the version of Coherence used in the cluster.
Memory: Get memory information, including heap size and used memory totals for all storage and client (non-storage) nodes. Also see the total percent memory usage for storage and client nodes. A blue-colored recent memory usage trend chart is displayed for storage nodes and another for client nodes.
Service Configuration & HA Status: Check the high-availability (HA) status for all Coherence protocol-related cache services used by applications in the cluster. The StatusHA column indicates whether primary and backup objects are distributed for surviving machine failure or storage node failure. The most secure status is MACHINE-SAFE which indicates that an entire host could fail and all data could be recovered. NODE-SAFE indicates that a storage node could fail and data could be recovered, but data could be lost with a host failure. ENDANGERED indicates that the loss of a single storage node could result in data loss in the cluster. Note that Coherence does not track whether enough free memory is available for surviving machine or storage node failure without data loss.
Also, see the number of caches in each cache service, the number of storage nodes participating in each cache service, the number of objects in each cache service, the senior member for the cluster and the senior members for each service. Click a cache service to view details in the Single Service Summary display.
Most Gets: Check on your four busiest caches (in terms of the number of gets reported in the last measurement). Mouse-over the bar charts to see the most recent metric for each cache. Select the Cumulative box to display the total number of gets since the cluster started (or since statistics were last reset). Statistics from the most active cache are displayed in the upper right field.
Largest Cache: Check on your four largest caches (in terms of memory usage). The largest cache’s current size, in units, is displayed in the upper right field. Mouse-over the bar charts to see the most recent metric for each cache. Units are user defined in your cache configuration file. Typically units are set to either the number of objects or the number of bytes consumed by objects.
Node Uptimes: Assess cluster stability. View how long nodes in the cluster have been members of the cluster. The Monitor looks at the start time of every node in the cluster, determines how much time the node has been part of the cluster and categorizes the nodes into seconds, hours, days, weeks or months. Typically, if a node leaves the cluster as the result of a fault condition, the node subsequently rejoins, appears as a “younger” node, and is placed in the seconds, minutes or hours category. This metric can be an important indicator of cluster instability. If a node leaves the cluster and fails to rejoin, the node is subsequently shown in the Departed Nodes box.
Memory Utilization: Determine whether cluster memory usage has been increasing over the last hour and by how much. These bar charts are capacity indicators as well as garbage collection indicators. The memory usage is shown for the most recent data collection, and as an average for the last hour. The red bar chart is for the node in the cluster with the highest memory use, and the yellow bar shows memory use averaged across the whole cluster.
Communication Success Rate: Determine whether packet loss is occurring. The bar graph uses pairs of bars in which one bar represents the publisher success rate and the other represents the receiver success rate. The bar charts are the most important indicator for any issue affecting cluster health or performance. The chart shows the TCMP publisher and receiver success rates for the last 20 minutes. The success rate is typically 99% or greater in healthy clusters. Publisher/Receiver failures (the inverse of success) indicate that packets sent between nodes are not being acknowledged within the timeout period (which is typically 250 ms). This is typically the result of a node being unavailable due to garbage collection. However, there are many other possible causes as well (such as a network issue, a defective NIC card, a garbage collection issue, disk swapping, or a shortage of CPU on a single machine). Investigate further by clicking the bar chart to view details in the Cluster - Memory/Network Health display.