Open the RTView Configuration Application, go to Server Configuration/Service Model and:
-
Toggle on Read Service Model from Database to organize CIs in COMPONENTS displays.
-
Toggle on Organize Services by CIType if you want to include CIs in Infrastructure Owner displays (recommended).
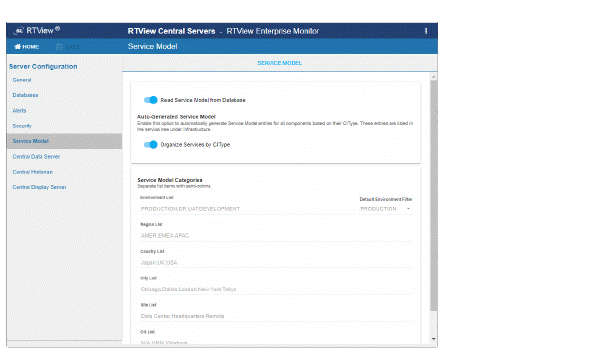
Under Service Model Categories, enter category names in a semi-colon separated list format for each field. Optionally, change the Default Environment Filter.
Click ![]() to save your changes, then click
to save your changes, then click  to apply them.
Open the Monitor and go to the CMDB Administration / CMDB Admin display.
Select a CI Type to configure from the Selected CI Type drop-down menu, located above the lower table. (The Selected CI Type drop-down menu is populated with installed and configured solution packages in your system.)
For example, to configure the jPeters / Development / Middleware / WebLogic branch as an example from the Small Company Example we select WLS.
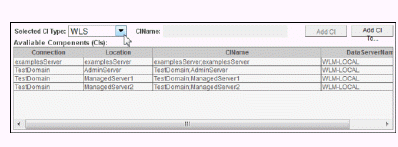
The Available Components table populates with CIs for WebLogic.
Select one or more CIs from the Available Components table and click Add CI To....
Note: To determine which CIs to associate with a Service, refer to the CIName column. The CIName column contains descriptive information entered by your administrator about the CI.
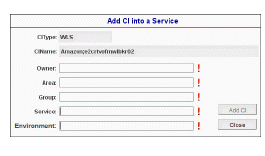
The Add CI into a Service dialog opens.
Associate your selected CIs with a Service by entering the Owner, Area, Group and Service. Refer to your defined CMDB structure to determine appropriate entries. For example, to configure the jPeters / Development / Middleware / WebLogic branch from our Small Company Example, we enter:
|
Owner: |
jPeters |
|
Area: |
Development |
|
Group: |
Middleware |
|
Service: |
WebLogic |
|
Environment: |
PRODUCTION |
Click Add CI and OK.
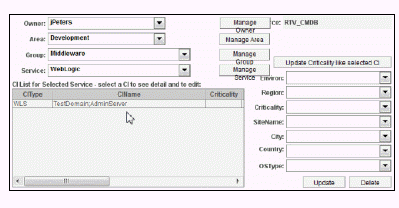
The CIs appear in the CI List for Selected Service table and are now associated with the new Service. The four levels are saved in the CMDB and populate the Owner, Area, Group and Service drop-down menus in the Administration - CMDB Admin display, as well as other displays.
Specify the rank of importance for a CI using the Criticality drop-down menu, where A is the highest importance and E is the lowest. Criticality is used to calculate the value for Alert Impact. For our Small Company Example, we set the WebLogic Criticality to E.
Optionally, enter the following for a CI using the remaining drop-down menus:
|
Region: |
Optionally, enter a geographic region in which the CI resides. |
|
SiteName: |
Optionally, enter a site name in which the CI resides. |
|
City: |
Optionally, enter a city in which the CI resides. |
|
Country: |
Optionally, enter country in which the CI resides. |
|
OSType: |
Optionally, enter the operating system on the CI. |
Click Update to save the entries.
Associate more CIs to this Service by selecting them and clicking Add CI. The CIs appear in the CI List for Selected Service table and the CIs are now associated with the Service. Use the Selected CI Type drop-down menu to associate a different CI Type.
Note: To modify settings (Criticality, Environ, etc.) for a CI, select the CI, change the settings and click Update. To remove a CI from a Service, select the CI and click Delete.
Add a new Service by selecting a CI and clicking Add CI To.... Use the Selected CI Type drop-down menu to locate the relevant list of CIs. For example, for our Small Company Example to add the GlassFish Service and associate GFS CIs, we select GFS from the Selected CI Type drop-down menu, select a CI from the Available Components table and click Add CI To....
The Add CI into a Service dialog opens.
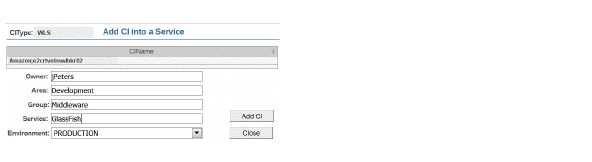
Make the appropriate entries and click Add CI and OK. For example, for our Small Company Example we make the following entries for the jPeters / Development / Middleware / GlassFish branch.
|
Owner: |
jPeters |
|
Area: |
Development |
|
Group: |
Middleware |
|
Service: |
GlassFish |
|
Environment: |
PRODUCTION |
The CI appears in the CI List for Selected Service table and the GlassFish Service is in the CMDB.
Specify the rank of importance for the CI using the Criticality drop-down menu, where A is the highest importance and E is the lowest. For our Small Company Example, we set the GlassFish Criticality to A.
Optionally, enter the following for the CI using the remaining drop-down menus:
|
Region: |
Optionally, enter a geographic region in which the CI resides. |
|
SiteName: |
Optionally, enter a site name in which the CI resides. |
|
City: |
Optionally, enter a city in which the CI resides. |
|
Country: |
Optionally, enter country in which the CI resides. |
|
OSType: |
Optionally, enter the operating system on the CI. |
Click Update to save the entries.
Add more CIs to this Service by selecting a CI and clicking Add CI. The CIs appear in the CI List for Selected Service table and the CI is now associated with the Service. Modify settings (Criticality, etc.) for a CI as needed and click Update.
Click Close to close the Add CI into a Service dialog.
Open a display, such as the Group / Service Heatmap, to view your entries integrated into the RTView Enterprise display.
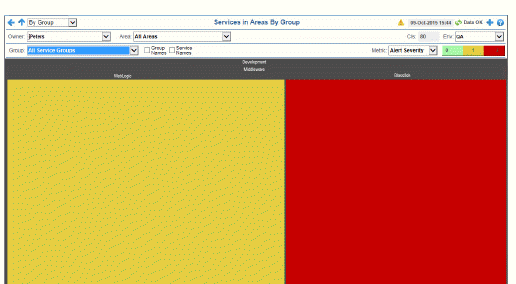
Continuing with our Small Company Example, we see the jPeters branch we configured in the display which has two Services in the Middleware Group:
|
Owner: |
jPeters |
|
Area: |
Development |
|
Group: |
Middleware |
|
Service: |
WebLogic GlassFish |
Note: There are two rectangles in the heatmap, one for each Service. Part of the heatmap is red, indicating the WlsThreadsTotalHigh alert state, which is the alert we adjusted thresholds for and enabled in the previous instructions. Recall that we set the Criticality level for a CI associated with the GlassFish Service to A (the highest rank of importance). For this reason the rectangle representing the GlassFish Service is red. The WebLogic rectangle is not red because we set the Criticality to E (the lowest rank of importance).
Repeat previous steps as needed until all CIs are associated with a Service.